Laura Rodriguez, Katie Herzog, Josh LeFevre, Nowell Kahle, and Arden Wolf
Originally published on Medium
Weekly posts chronicling the development of Emotional Modeling, a project for New Ways To Think: Materializing Mental Health, September–October 2018
Week 6: October 18
This week we began testing our final design kit with students within CMU. From our initial testing and research we found that allowing individuals to create their representation in private yielded the most emotionally complex results. (Read more about our process in previous posts.)
Below, we will outline the results of our final testing. Our goal in testing was to verify the efficacy of the kit as well as to see what patterns might emerge across individual creations and the meanings participants chose to attach to certain shapes and materials.
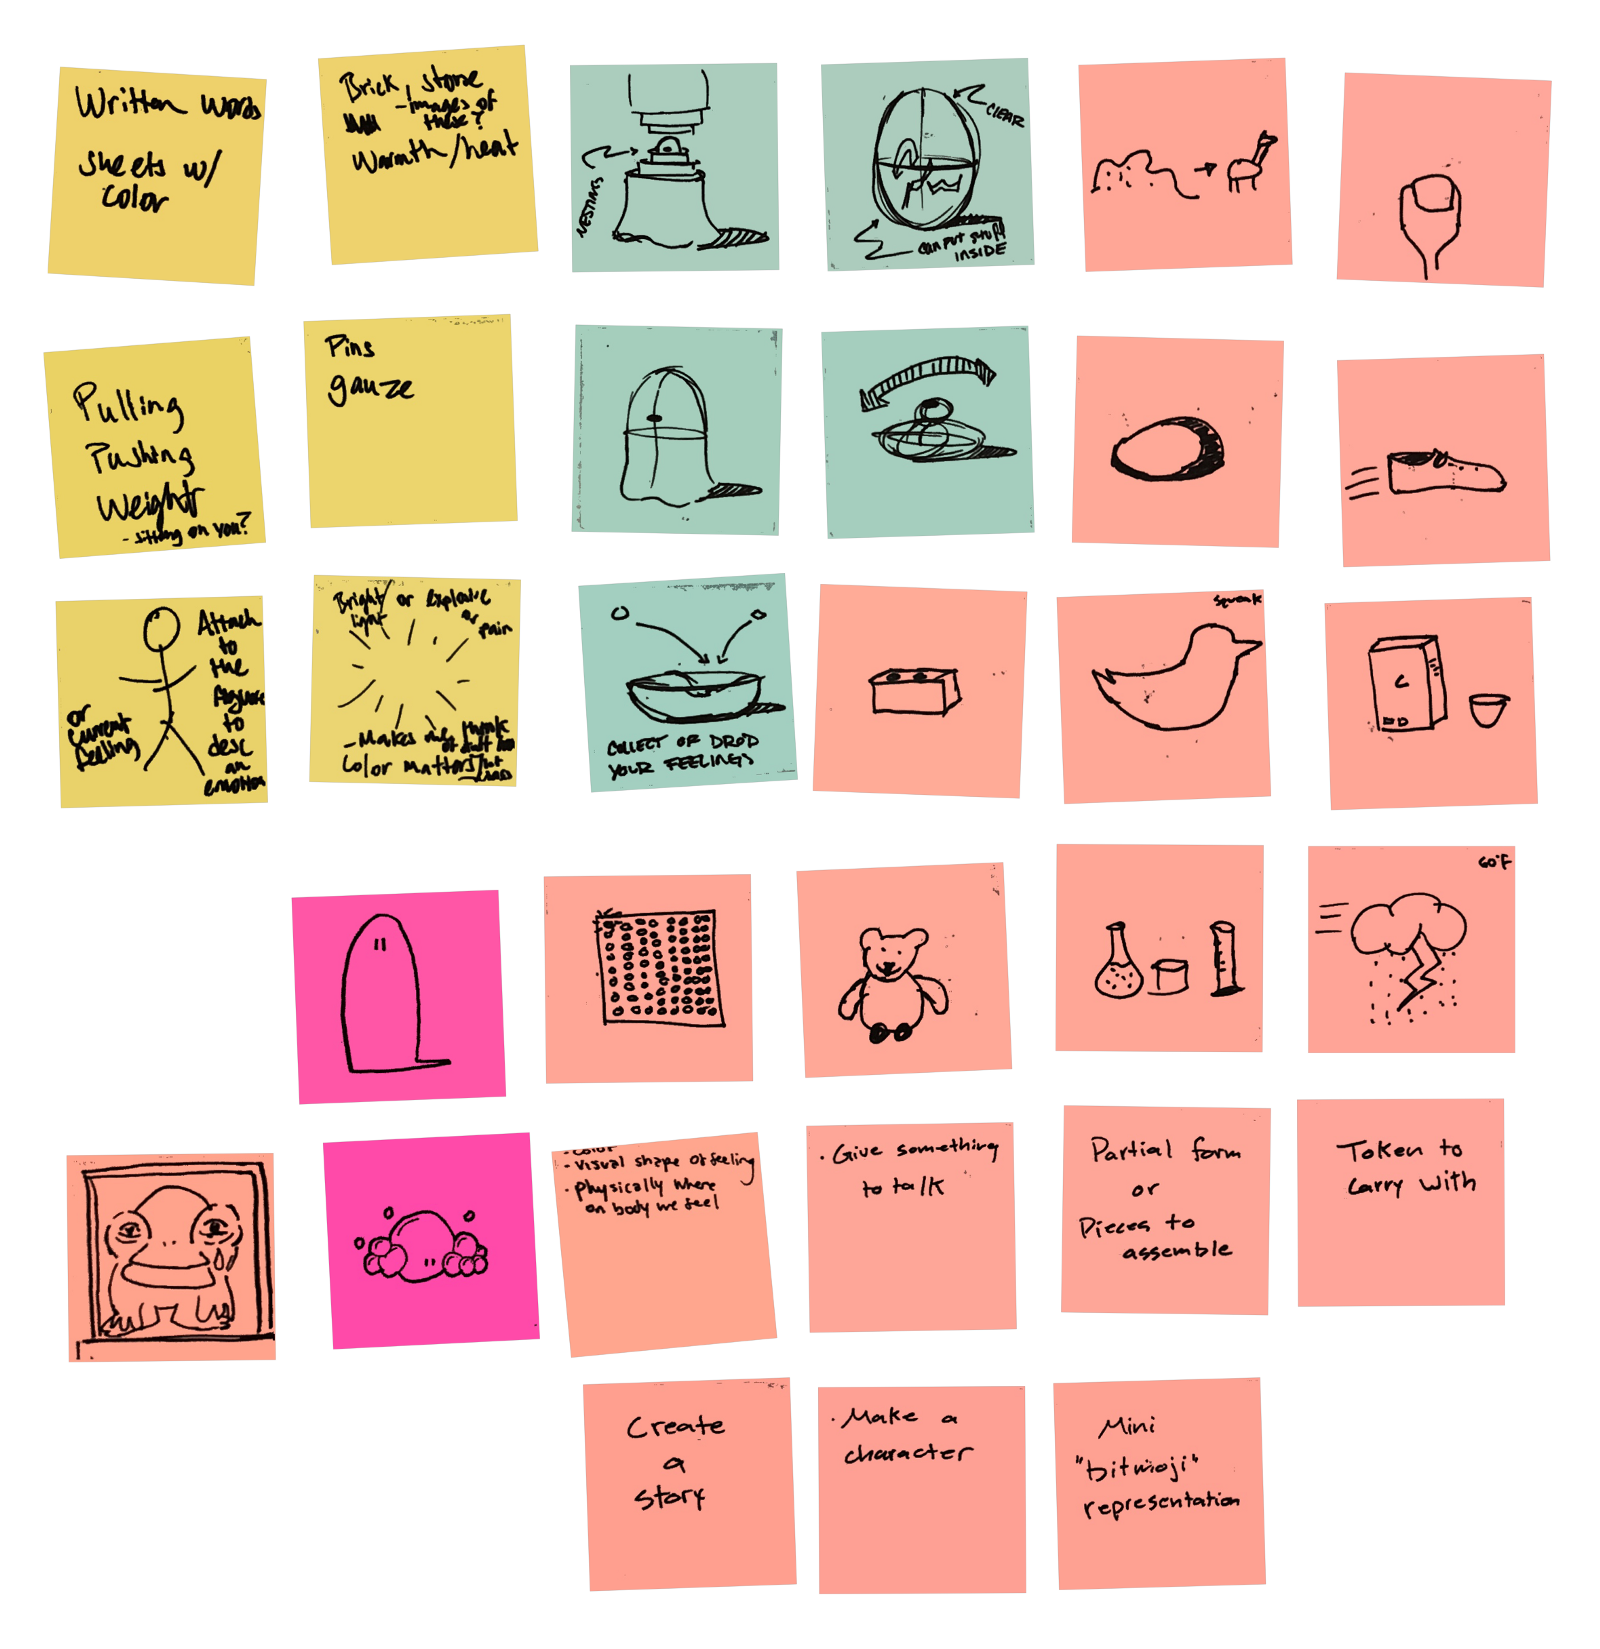
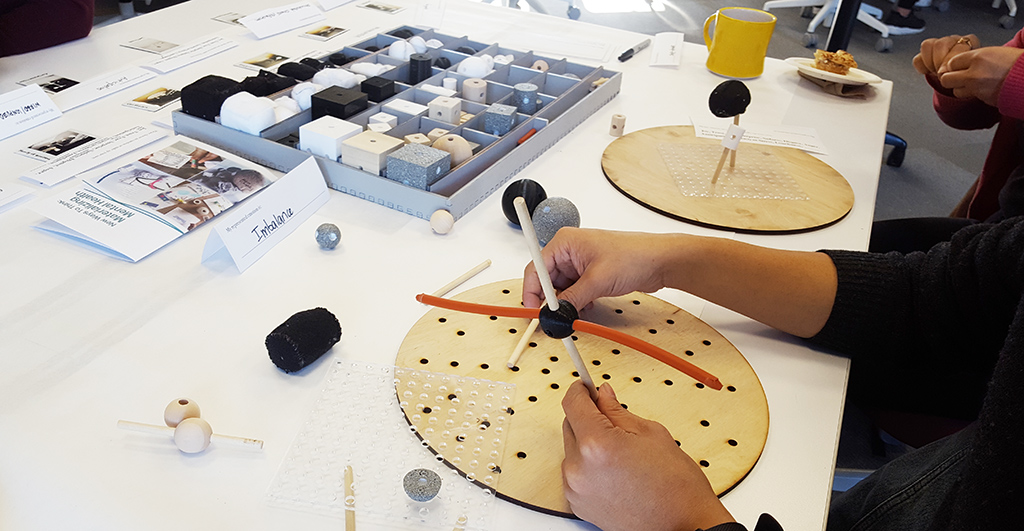
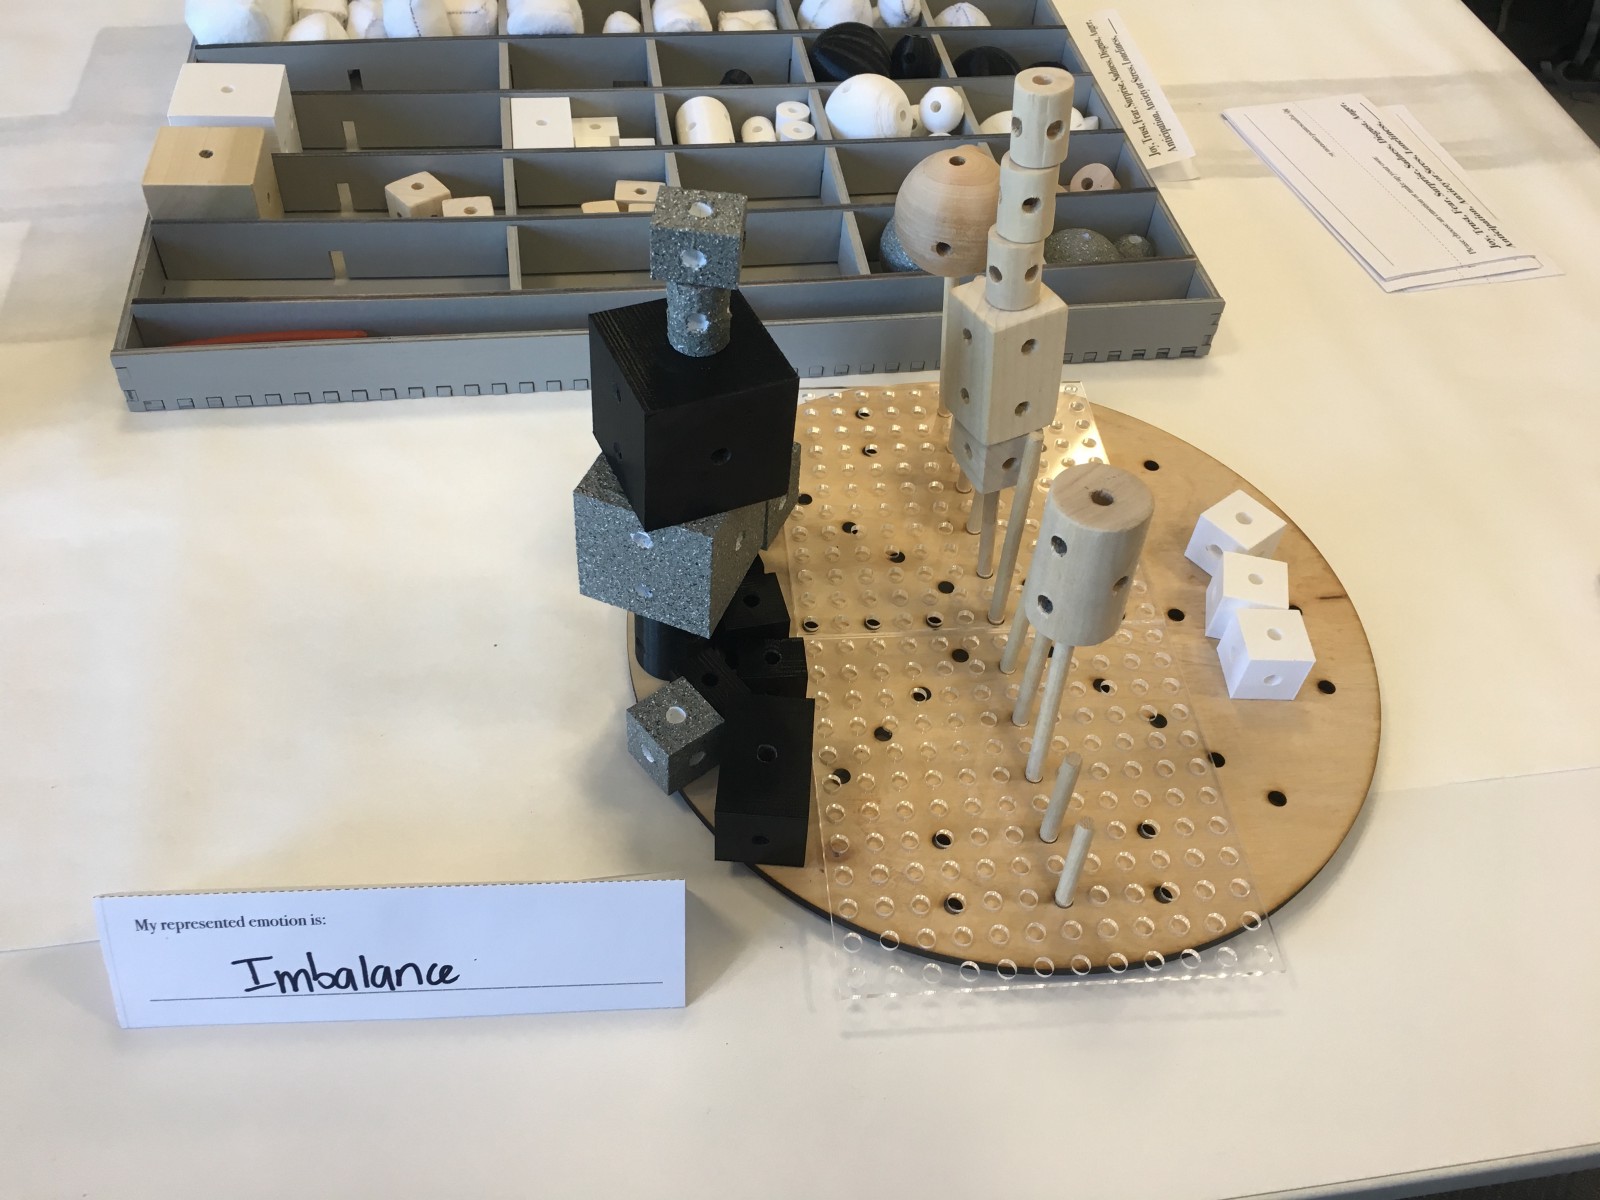
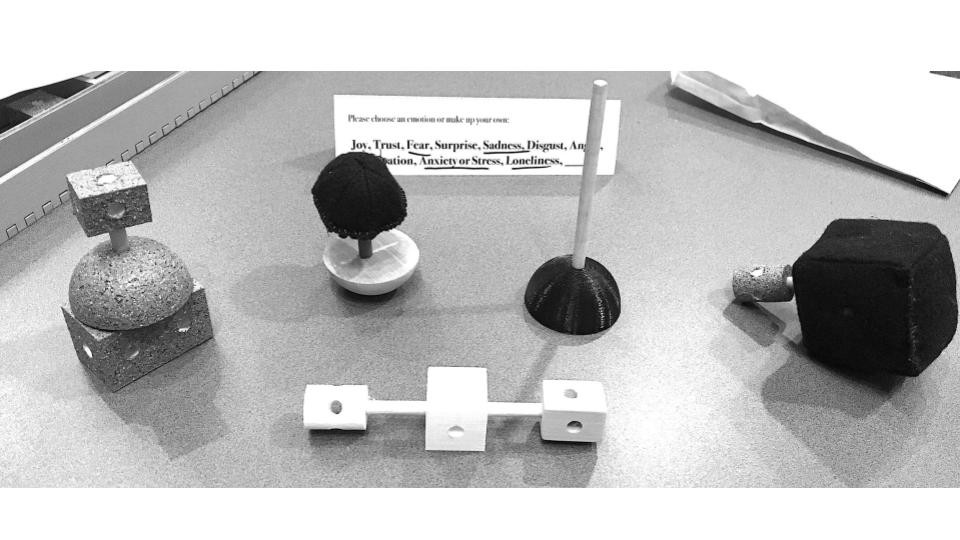
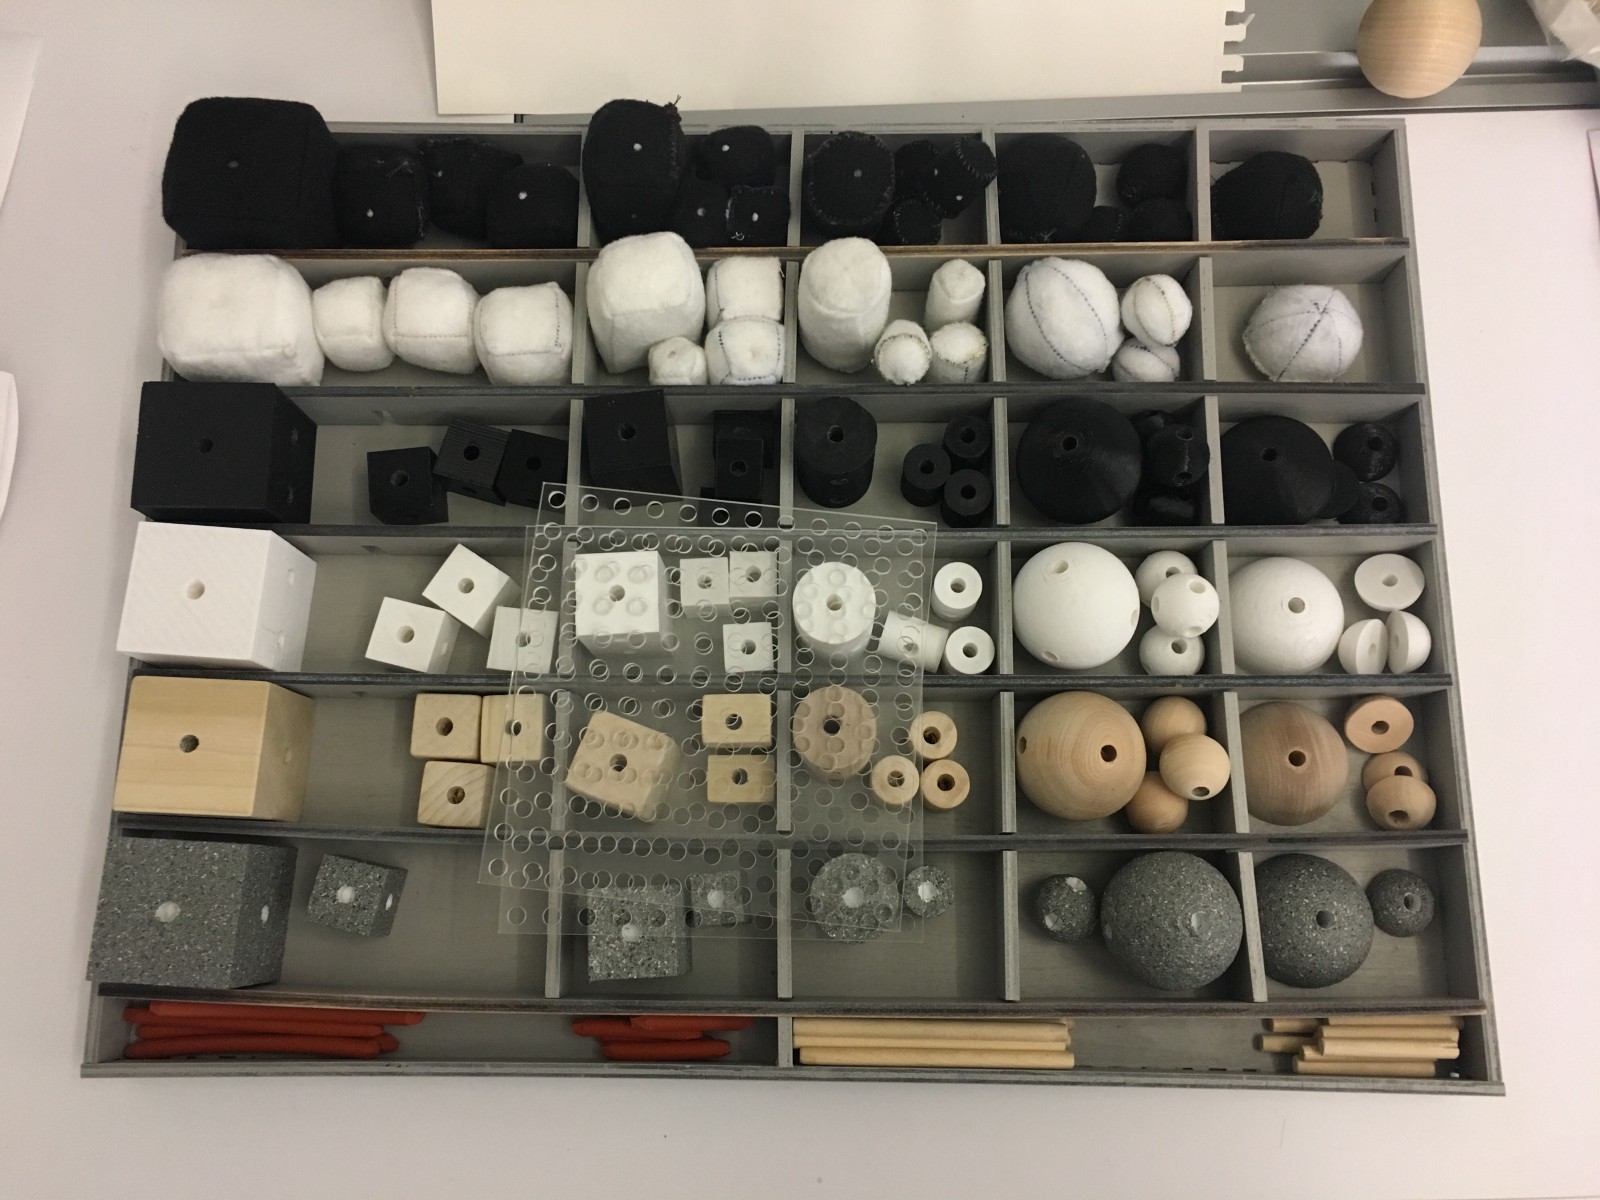
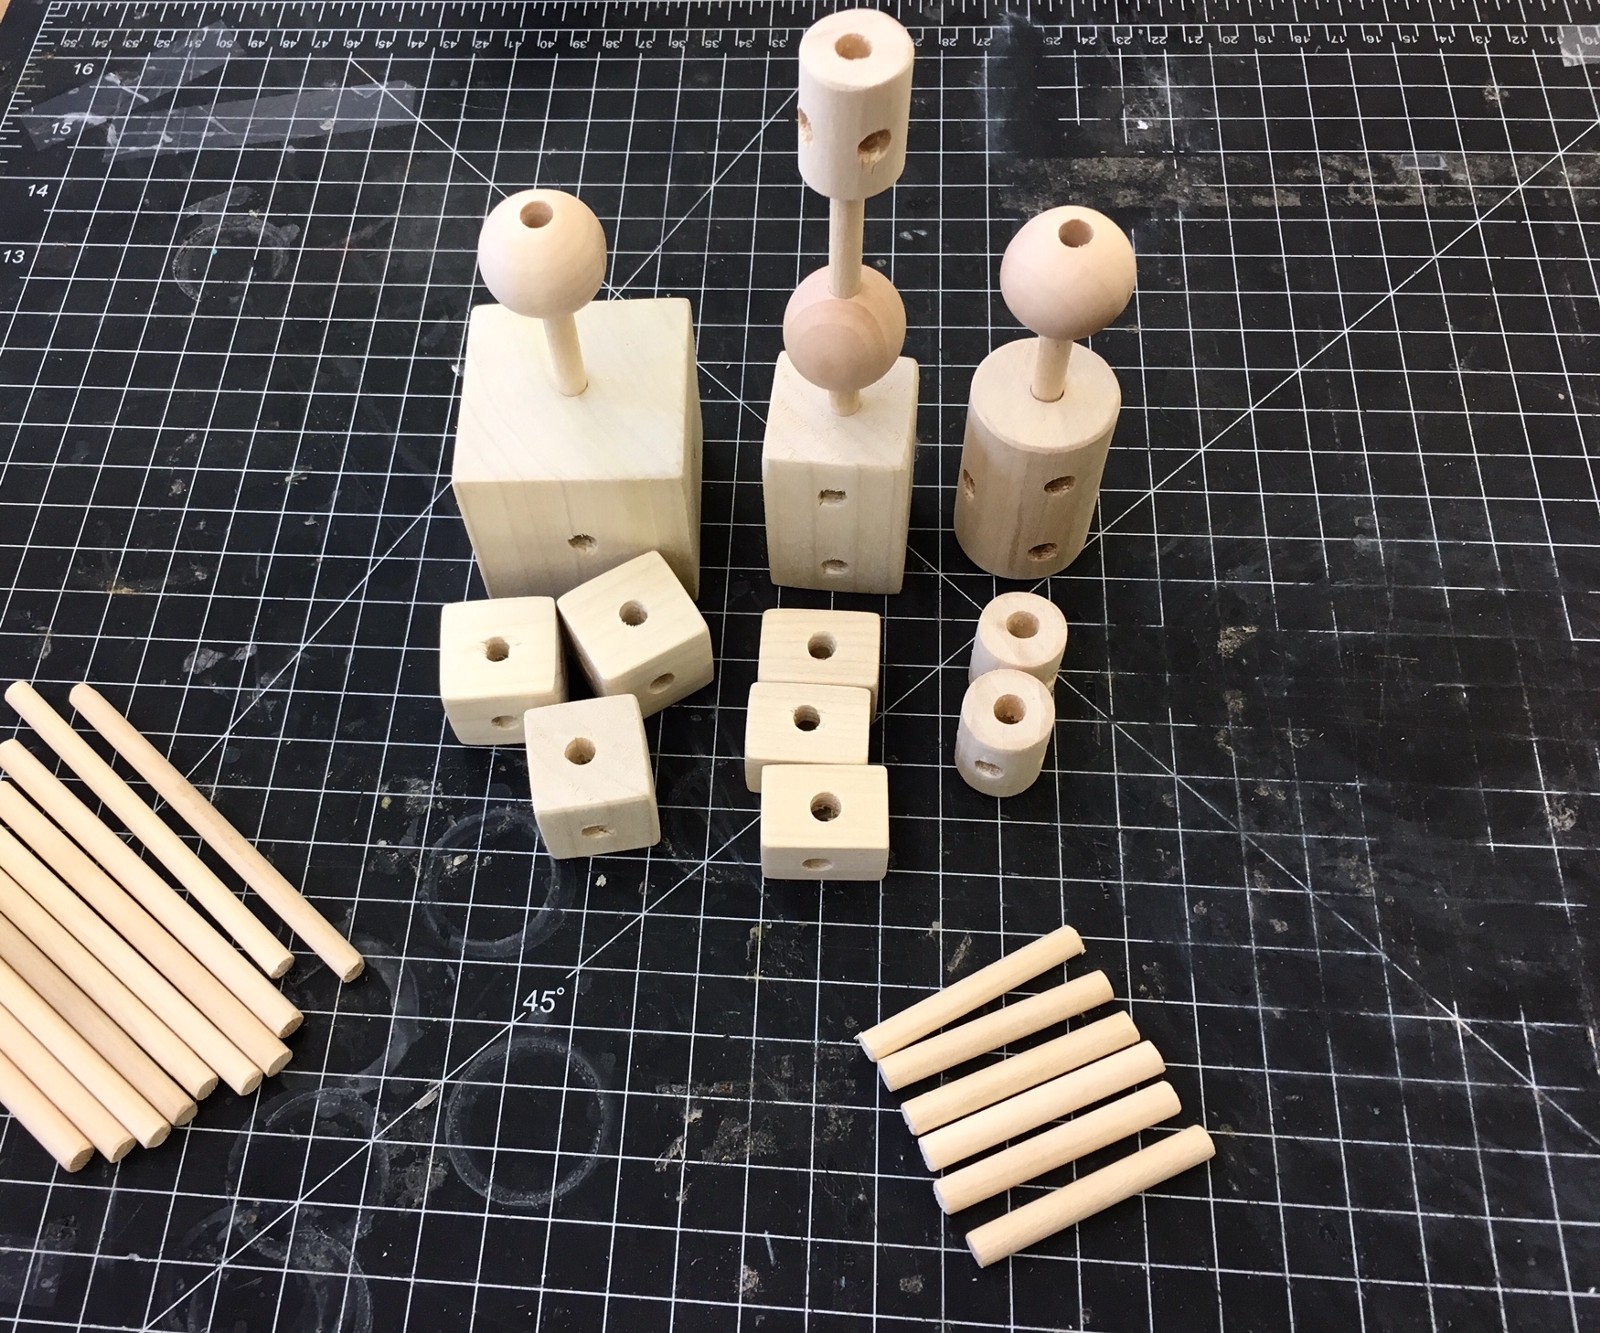
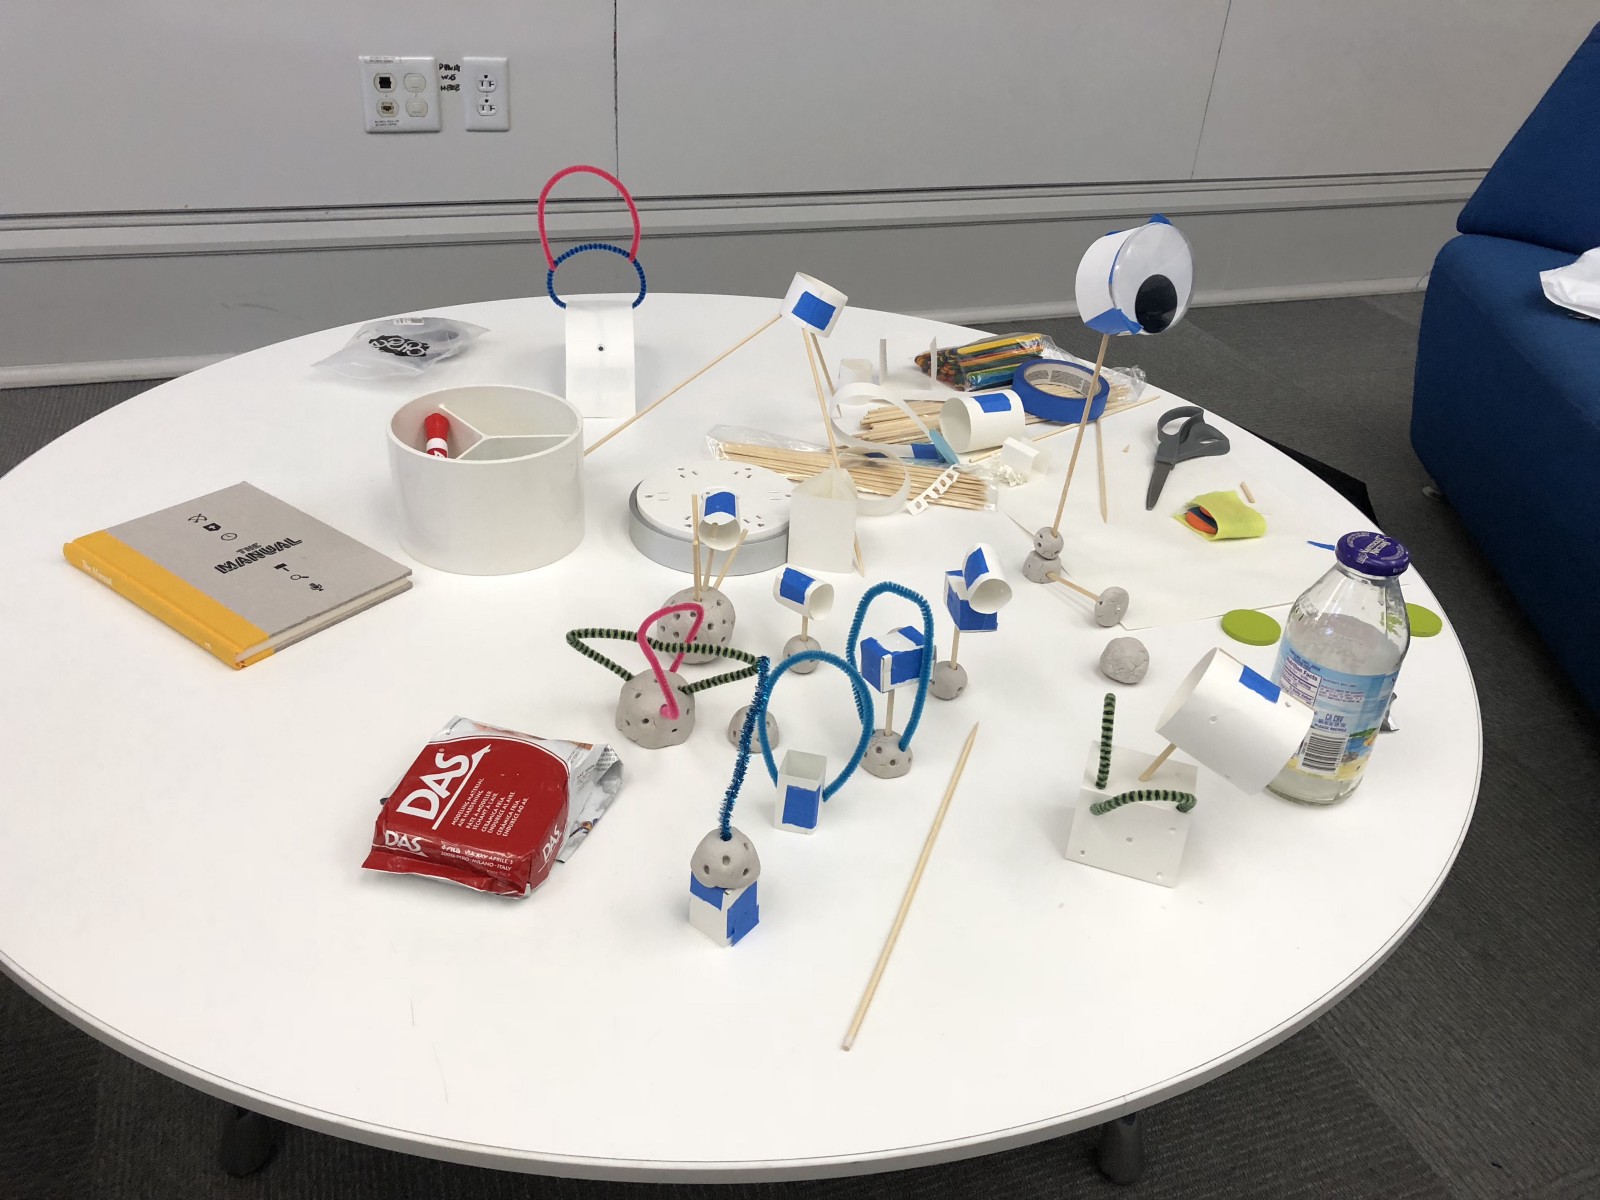
The final kit included cubic, rectangular, cylindrical, spherical, and hemispherical geometric shapes in various sizes and materials (stone, plastic, felt, and wood.) Along with the volumes, we provided stiff wood connectors and flexible silicone connectors for participants to build with. We also found that for some participants, providing a base or platform on which to make their object lowered barriers for participation. As such, we provided three types of bases (clear square bases with holes as well as wooden circular bases with and without holes.)
Testing
To test our kit, we approached several students on campus and asked them if they had a few spare minutes to participate in our research. A generalized structure of the prompt and conversation is provided here:
RESEARCHER: Hello, My name is _____, I am a masters student here conducting anonymous research on the emotional and mental states of students at Carnegie Mellon. Would you be willing to take 5 minutes to help us understand how you visualize your emotions/mental state?
PARTICIPANT: Sure
RESEARCHER: Great! Please take a moment to consider the emotions or mental states you’ve experienced in the last 24 hours. (pause) Now, choose the most prominent emotion or mental state and write it on this tag. Then use the pieces in this kit to model the emotion you wrote. Please feel free to take as much time as you need. I’ll just sit over here but feel free to ask me any questions. When you’re done, just let me know and I’d like to talk about what you made and take a picture of your creation, but only if you are ok with that.
PARTICIPANT: Fun! (makes object)
PARTICIPANT: Done.
RESEARCHER: Cool. This looks awesome. Before I take a picture, if you feel comfortable, would you mind walking me through what this creation means to you and why you chose the shapes/materials that you used?
PARTICIPANT: Participant explains creation and meaning assigned to elements of their model. This opened up many deep thoughts and ideas they were experiencing (100% of participants we interviewed were excited to share what they had created and explain it to us).
RESEARCHER: Back and forth conversation until done.
RESEARCHER: Thank you for participating, your work and comments will remain annonymous. Since this is your work, would you please take a picture for me of your creation from the angle your creation should be viewed from?
PARTICIPANT: Sure.
RESEARCHER: Great! Would you like a copy of your picture? (95% said yes; then we took a picture with our polaroid camera and left them with the photo)
Synthesis
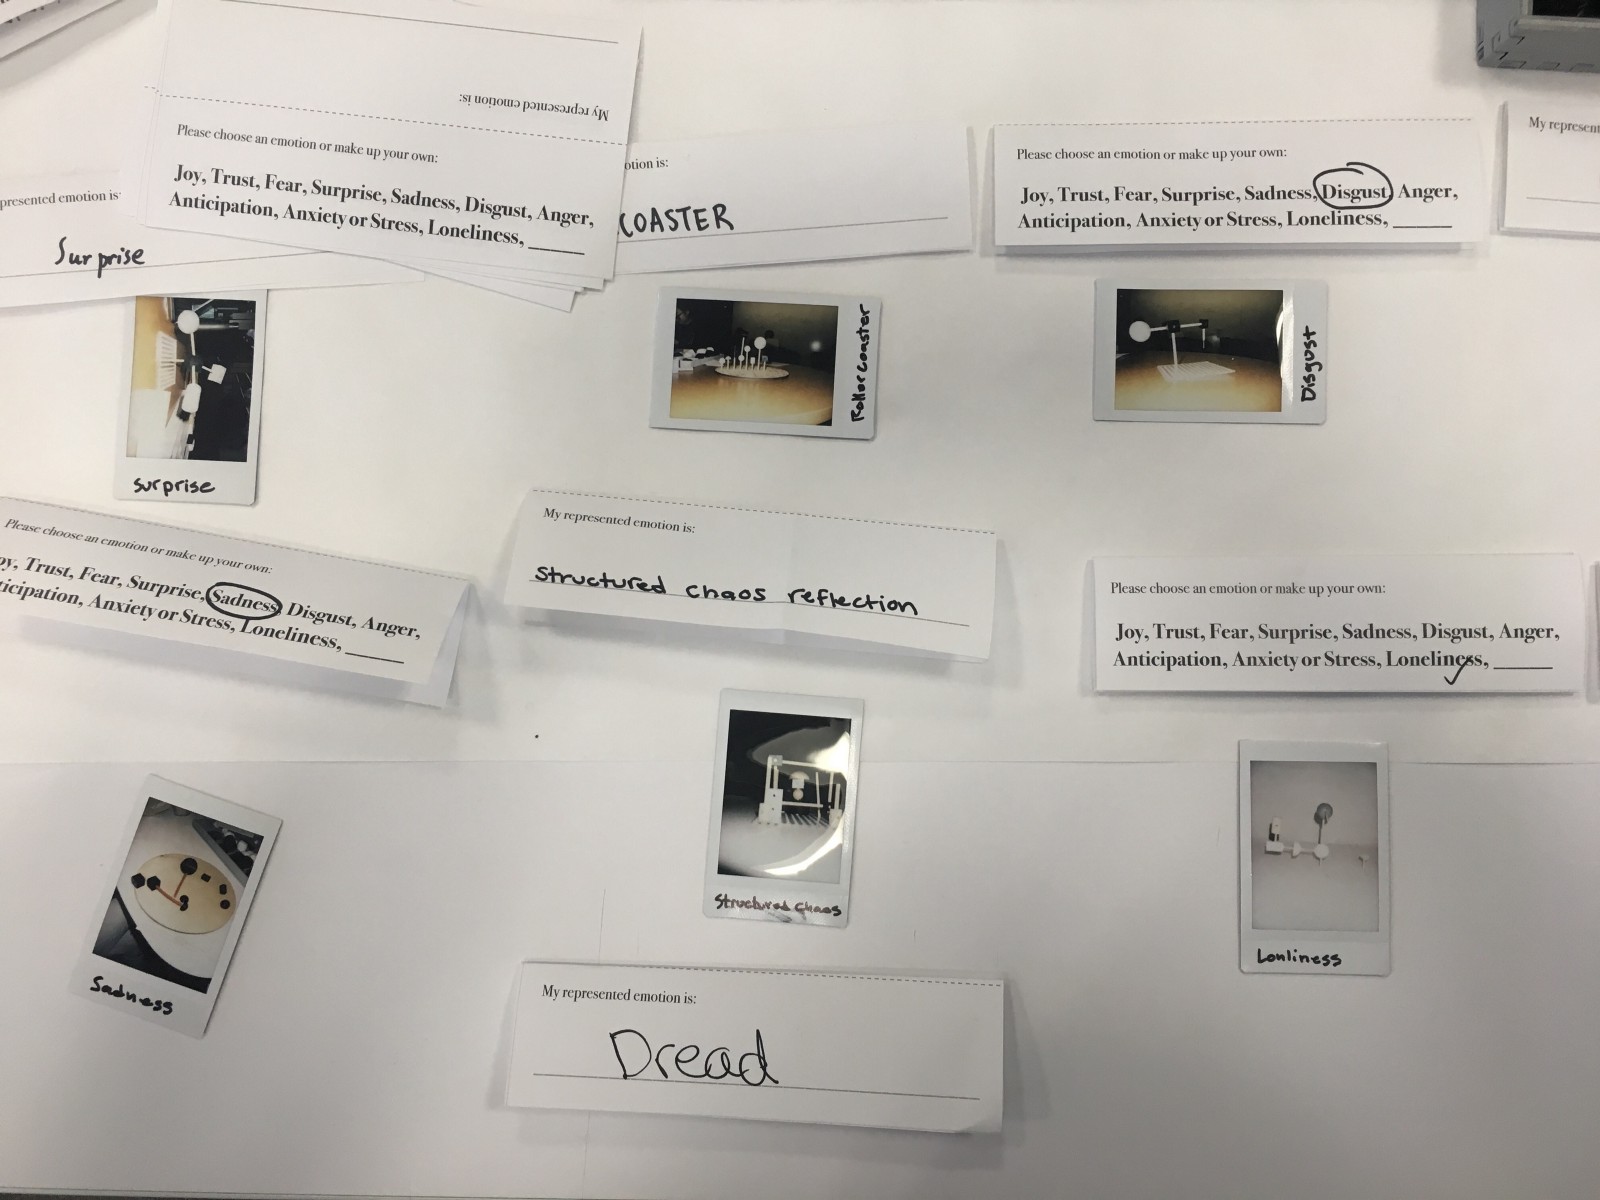
We were able to test with over 30 students. After the interviews we began pairing the same emotional models together, along with the basics of their descriptions to see what similarities or themes we could find.
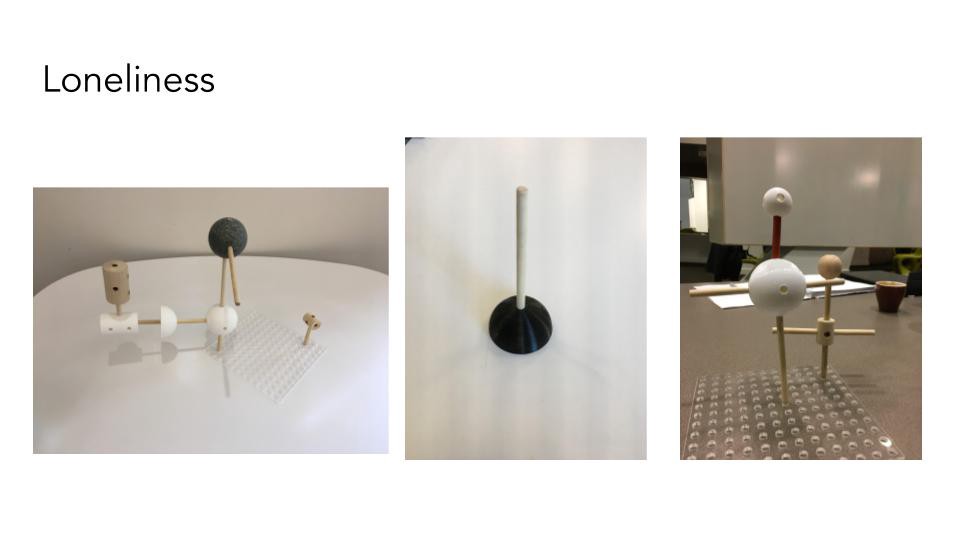
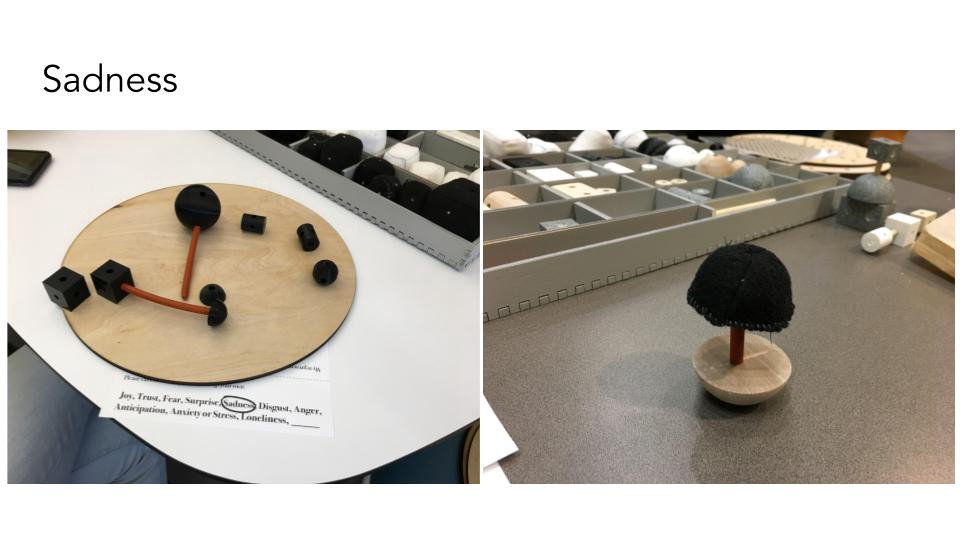
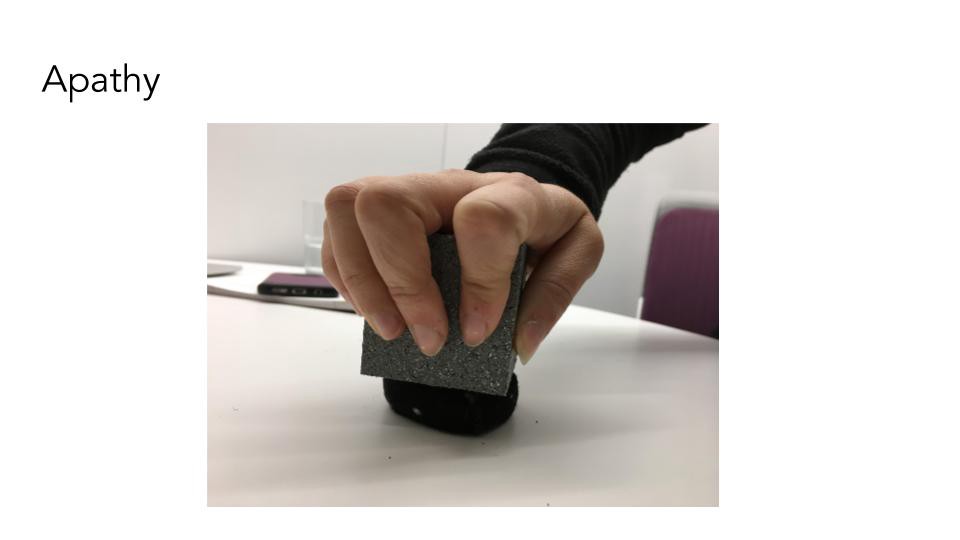
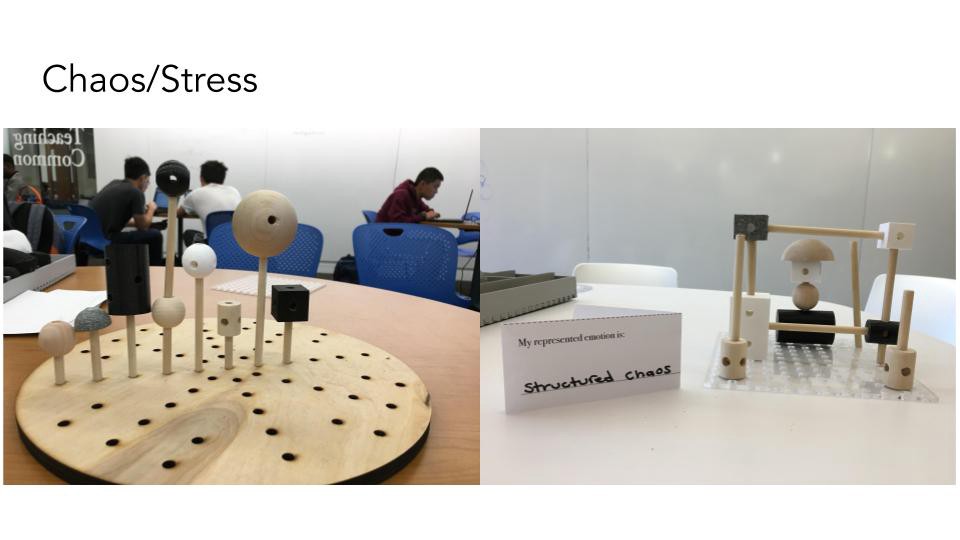
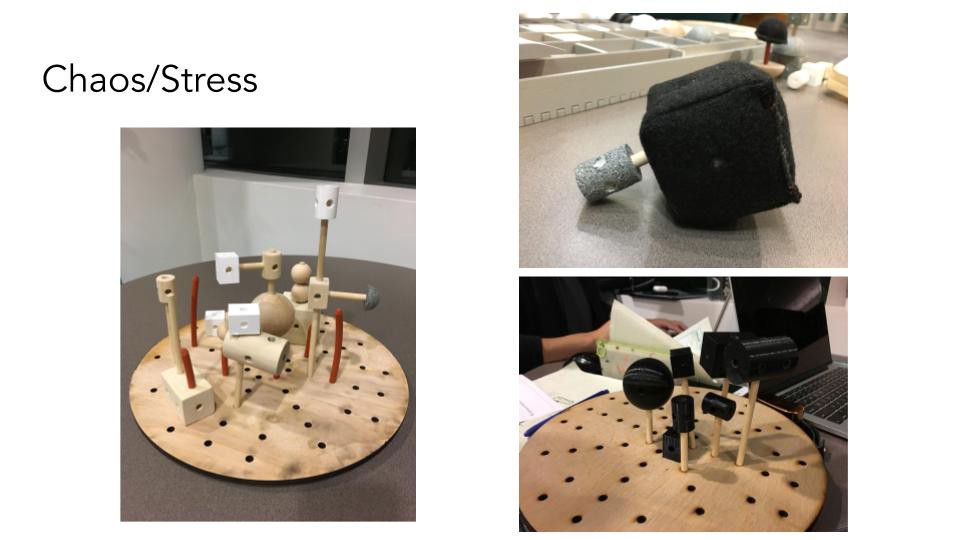
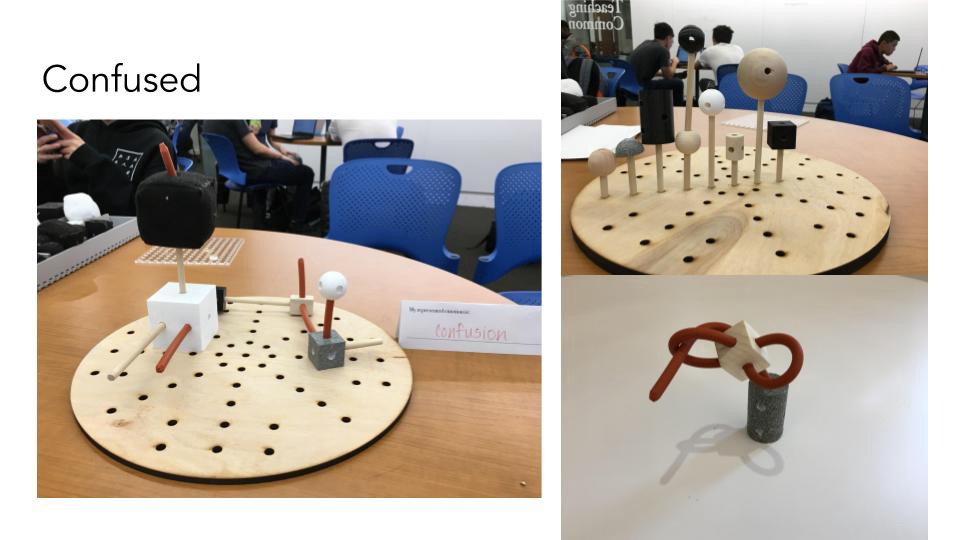
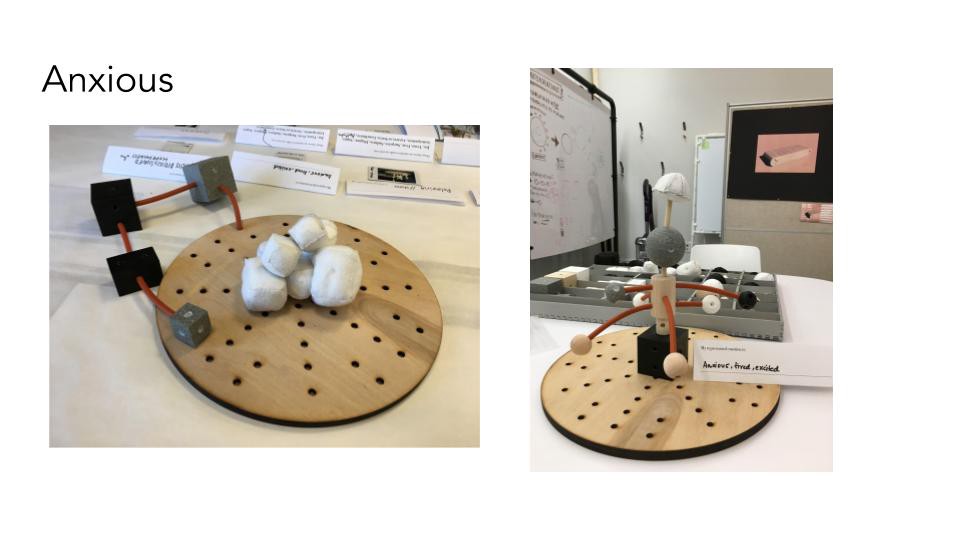
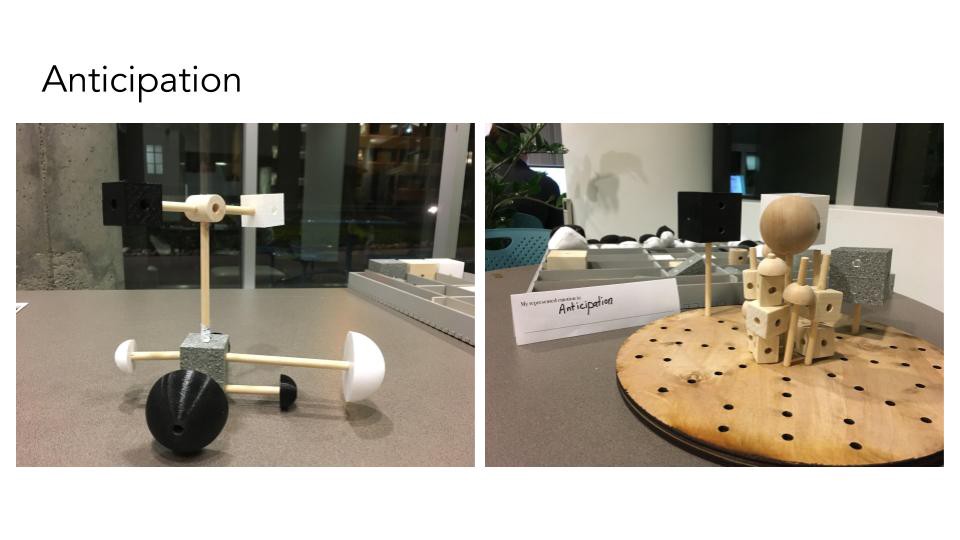
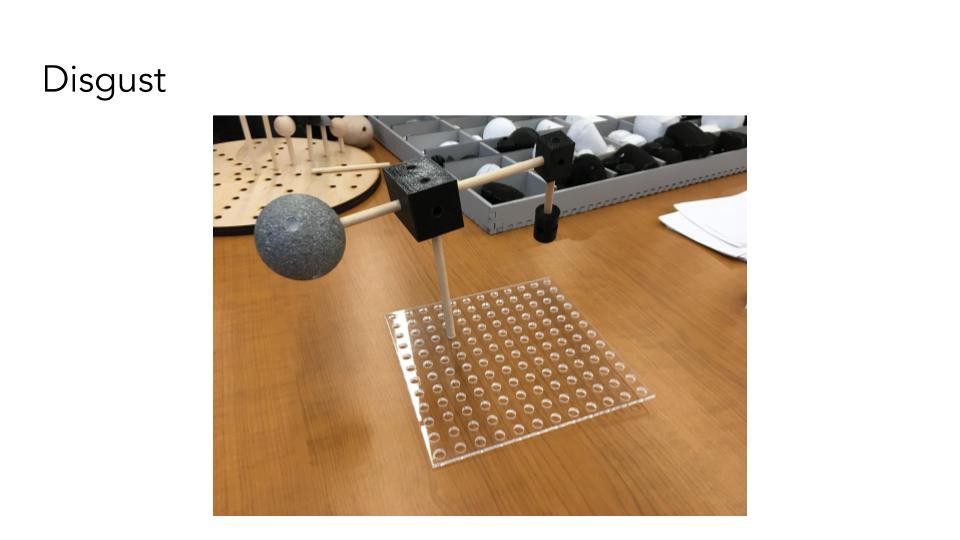
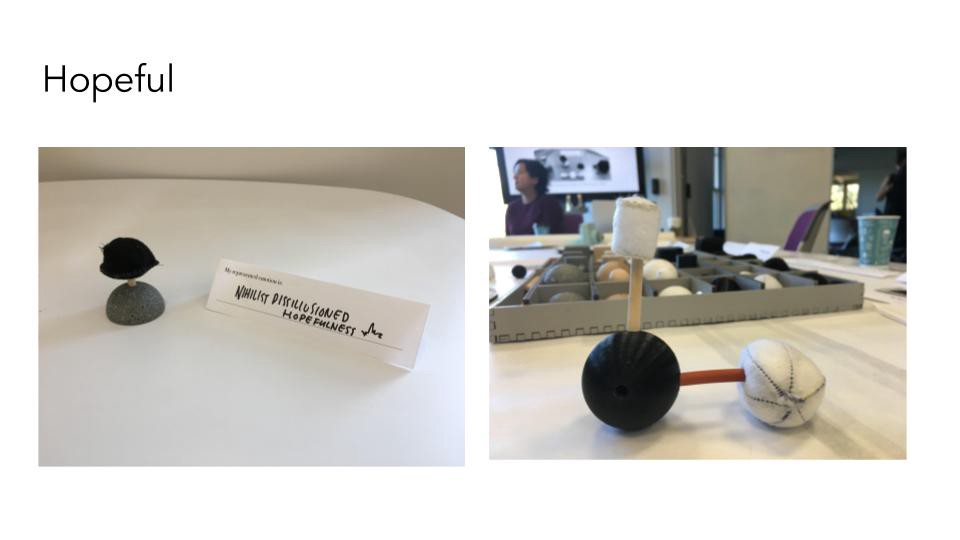
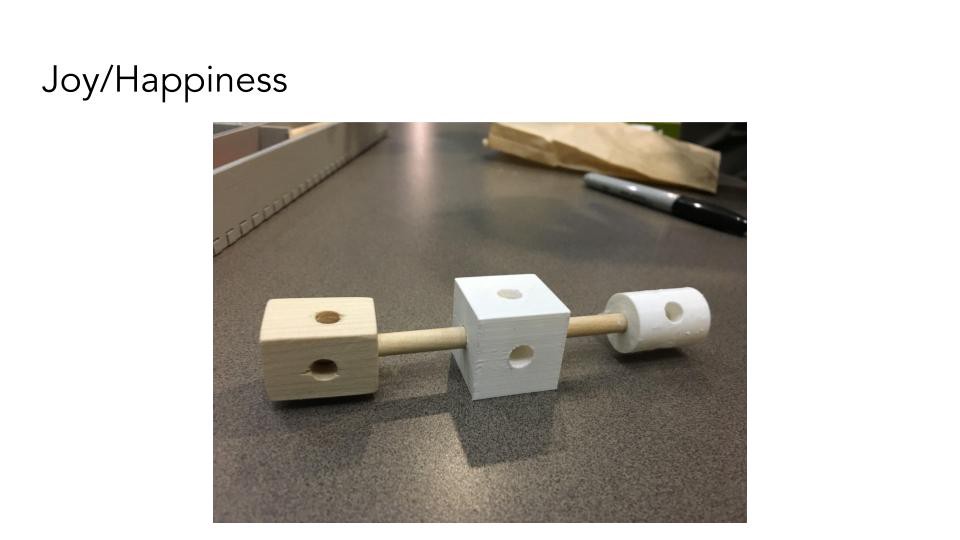
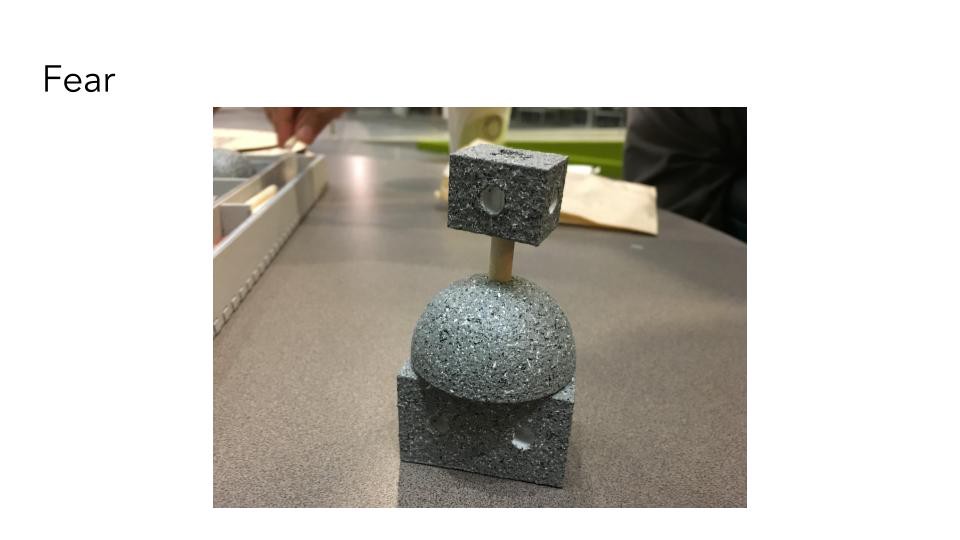
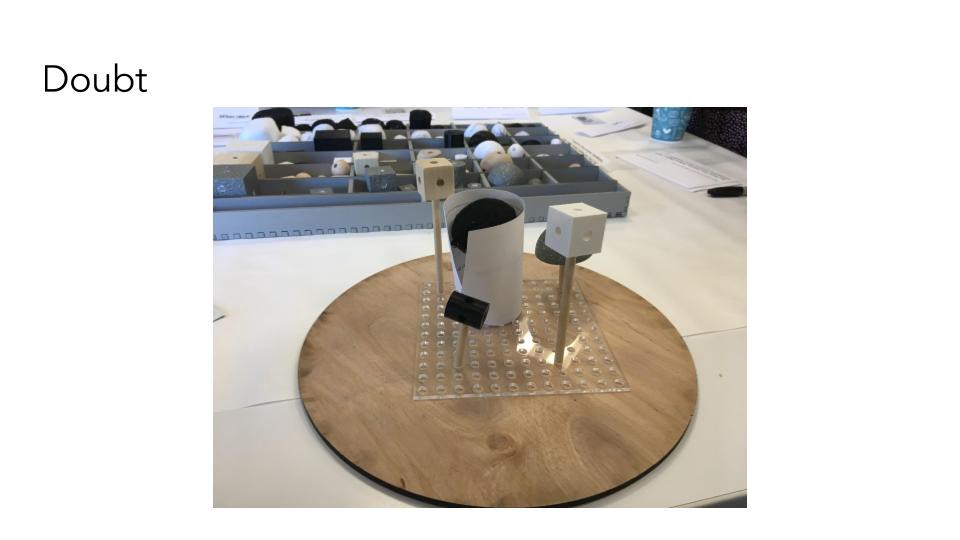
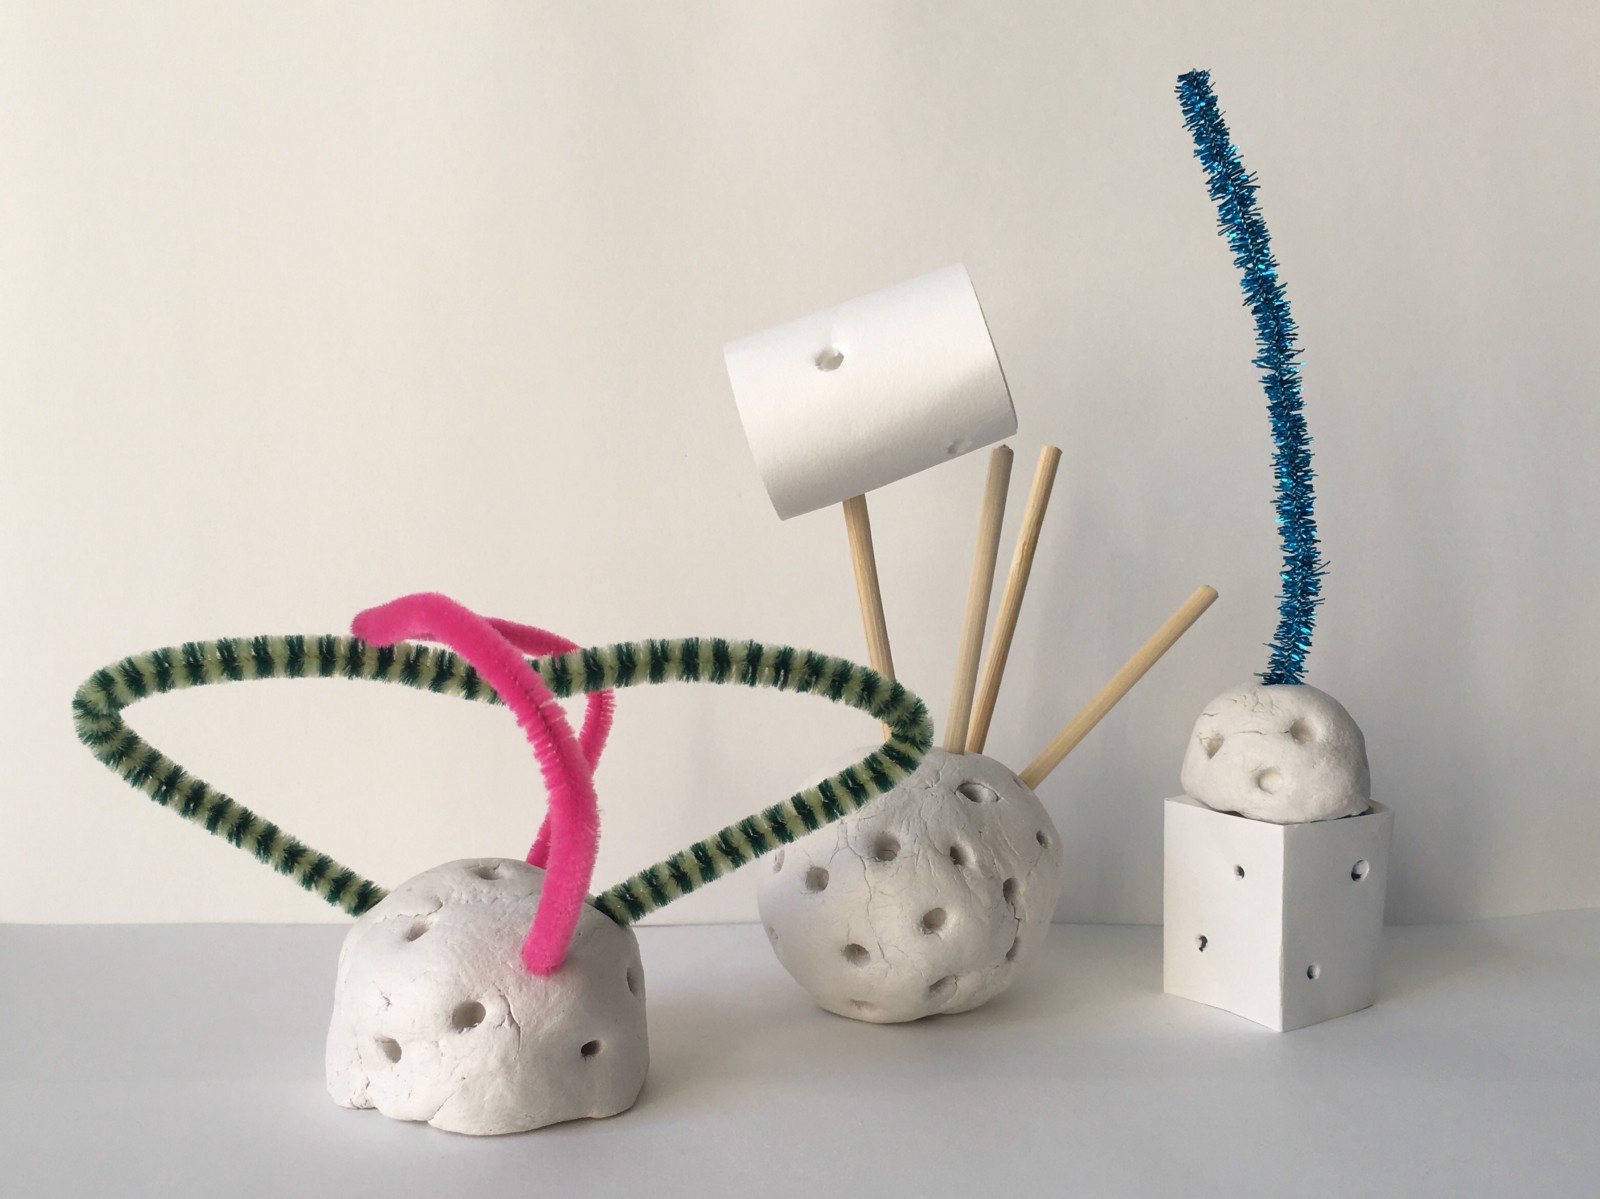
Below, you can see a sampling of emotional representations created.


Material Insights
Each section below contains the most common metaphors used by participants when describing various attributes. Interestingly, there were many overlaps between geometry, materiality, etc.
Geometry
- Squares: were used as metaphors for stability, balance, structure, competition, connection, building, strength, and a unchanging nature.
- Rectangles: were used as metaphors for consistency, consecutiveness, obstacles, and barriers.
- Cylinders: were used as metaphors for slyness, unpredictability, humor, brains, and mobility.
- Spheres: were used as metaphors for weight, flexibility, instability, motion, change, and potential.
- Hemispheres: Were used as metaphors for stability, imbalance, resoluteness, individuality, and protection.
Materiality
- Felt: happiness, soft emotions, flexibility, and pliability.
- Plastic: cold, unfeeling, imposed by others or self, and opportunity.
- Wood: natural, daily occurrence, comforting, and familiarity.
- Stone: strength, weight, unchangeable, and supportive.
- Stiff connectors: specific and defined.
- Flexible connectors: undefined, changing, and tiring.
Color
- Black: darkness, sadness, deepness of feeling, contrast, nagging, mystery, pressure, and changability.
- White: happiness, unkown, day, clarity, and achievable.
- Natural: warmth, honesty, and transitory.
- Grey: necessary, indecisive, weighty, and unchanging.
Bases/no bases
- The bases had little metaphor or thought assigned to them. Participants regarded them more as opportunities for building.
Emotional/mental state insights
1. Overall, participants responded very positively to the process of modeling their emotions and were generally enthusiastic (many noted that creating their emotions felt “liberating.”) We also observed that after individuals had finished creating their representation of an emotional or mental state, it became easier for them to share their thoughts, validating our theory that by “externalizing” their emotions, people might feel more comfortable discussing them. We believe that by addressing their emotions as a now-physical object, participants were relieved of the burden that comes from having to talk directly about themselves. We also found that most individuals wanted to keep a photograph of their creation because, as one participant noted, “it feels like a part of me.”
2. Joy and positive emotions emotional states were typically small and relatively simple. Many participants noted that happy emotions seem “easy” and simple to construct, while more negative emotions tended to be more complex and unwieldy, resulting in representations that embodied barriers and restrictions.
3. We found with some creations, even those that represented more positive emotions, that participants were excited to take part, but there was still an undercurrent of uncertainty and tension evoked by the thought of sharing their emotions.
Next Steps
- Test with a larger sample size to aggregate more responses.
- Codify participant explanations.
- Display objects and allow people to react to what they see.
Reflection
This was an amazing project. We learned quite a bit about how individuals think, what prompts them to engage, and how externalizing thoughts encourages non-judgmental observation and discussion around difficult topics often locked inside one’s head.
We believe this activity helped participants move beyond the some of the more typical metaphors associated with mental states/health (such as describing depression as “being in a pit of despair”) and assign meaning to physical objects more abstractly. It was interesting to explore how individuals apply meaning to objects, materials, and shape and how even with a simplified palette they are able to explain a complex feeling
Week 5: October 11
This week we are making the final elements of our prototype and user testing.
Over the past week we have continued to create additional materials for the kit. We also identified a method to create an alternative to our concrete objects. In order to create this new version, we placed ball bearings inside of 3D printed objects to give them the desired weight. We then covered the objects with a stone like finish.
In addition to creating the objects for the kit, we also created a container for the objects using plywood cut to form a box. We created separate compartments for each type of material, size, and color and the connectors. We painted the box grey to contrast with the objects.
Based on our initial tests, we recognized that people prefer to have a space provided in which to work. While a marked area on a sheet of paper worked well for the 2D kit, for 3D we needed to provide something different. We created wooden and clear platforms for people to construct their objects on. We also put holes into the platforms so that they could start their objects with a connector should they so choose.
This final prototype will be tested prior to sharing our process and findings on October 18th.
Week 4: October 4
This week we worked on developing a more refined prototype of our kit and met again with Viviana Ferrer-Medina to discuss our concept.
Prototype Construction
To develop the more refined kit, we began collecting materials and fashioning them into the pieces we had planned. To begin, we decided on the measurements we would use and purchased small wooden dowels to use as the stiff connecting pieces. We also purchased silicone to use as flexible connectors. These we cut down to two lengths to provide some variety in how the other pieces could be joined.
We then purchased or gathered wood to build the first set of shapes. We cut the wood to proportion and drilled holes in them to fit the connectors. We decided to leave the wood uncolored in order to leave the feel unaltered and to keep the distinctive look of the wood relative to the other materials we planned to include.
In addition to the wooden objects, we also gathered materials to create a set of objects using felt. We sewed the felt together into the desired shapes and filled them with cotton balls to help create the forms. Small holes were created in the felt to fit the connectors.
For the plastic objects we made use of the 3D printers in the materials lab. We had solid objects created with the holes necessary for the connectors. These objects needed some additional work after creation. In order for the connectors to fit properly the supports inside the holes had to be cleared out and the holes had to be filed to be the correct size.
We explored the possibility of creating materials from concrete, but found that creating objects of the size we wanted with holes would not be durable. As a result, we began investigating the possibility of creating these objects in a different way that would still give the feeling of stone or concrete, but would address the durability issue. We will work on solving this over the next week.
We also created plans for a container to hold the materials in the kit. This will be created using plywood and cut to shape with laser cutters.
Discussion with Viviana
In addition to creating materials for the next iteration of our kit, we also met again with Viviana Ferrer-Medina. We discussed what we learned from our initial testing, shared our plan for next steps and discuss the script we had developed for when we explain the purpose and instructions to participants.
Based on her feedback we made wording changes to our scripts to clarify the purpose of the project and to make the instructions for participants easier to follow. She suggested we use the word “visualization” as oppose to “externalization” because she felt that “visualization” was more approachable and easier for others to understand. She thought including a word bank was a good idea because it would provide the participant with a starting point. She suggested we adjust the words included in the word bank by only using words that would be relatable to everyone. So we removed words like Depression because it did not fit well with the other words that were all emotions. She also suggested that we add more words that would relate to the CMU community because they were the individuals who we would be testing with. So we added Loneliness and Stress since these fit with the other words and are common feelings in our community.
Week 3: September 27
Exploring Construction Methods
Following these two sets of trials, we decided to create a more deliberate version of a three-dimensional kit. We wanted to provide a balance of flexibility and constraint in the materials provided. Because we found in the first round of testing that participants had difficulty with the actual construction of their visualization, we discussed multiple methods of construction that would be easy for the user. A few ideas included using magnets as a method of joining pieces, as well as inserting wires into the pieces so that the user could easily bend them into the shapes they wanted. We decided to move forward with a tinker toy construction method.
Because we found in the first round of testing that the participants felt overwhelmed by the number of choices they could use and add their personal meaning too, we decided to restrict the number of elements that would act as representative elements. We choose to work with shape, size and material/texture. The materials chosen were a set of shapes (cube, rectangular prism, sphere, hemisphere, and cylinder) in two sizes, and in four materials (wood, concrete, plastic, felt). The shapes have holes in them that fit two different types of connectors (wood and silicone) allowing participants to connect the objects together in a variety of ways.
Based on this concept we created several prototype materials to validate our thinking before investing the time and energy in creating them in the desired materials.
Based on our own experimentation with the prototype materials, we decided to move forward with this approach. We will be prototyping in the correct materials this week so we can test out the materials we have identified and see how people relate and give meaning to the different materials and forms we have provided.
Exploring the Verbal Presentation
As we began work constructing this kit we also worked to finalize the other details of how participants would interact with this kit, specifically how we would invite people to participate, what instructions they would receive, what the setting would be like for people creating a sculpture with the kit, and if and how we would communicate with them after they finish. We drafted a version of a script for each stage of the process, emphasizing transparency and the opportunity for anonymity. We also decided based on our initial trials to offer participants a word bank from which they could select one emotion to visualize. The reason for this approach was two fold. First, we wanted to give some sort of prompt to avoid the intimidation that can come with being faced with a blank sheet of paper. Second, we learned that asking someone to create an object for a specific emotion could be forcing them to engage with something that makes them uncomfortable. Providing options in the form of a word bank and the ability to write in something else alleviated that pressure.
The words we initially chose were based on Robert Plutchik’s theory that there are eight basic emotions: Fear, Anger, Sadness, Joy, Disgust, Surprise, Trust, and Anticipation. We also wanted to include Anxiety and Depression, per our initial trials.
Before using any of these scripts or the word bank in broader testing, we decided to meet again with Viviana Ferrer-Medina to hear her feedback and adjust accordingly.
Week 2: September 20
We decided to test 2D and 3D kits in parallel to see how users would react to the different methods and mediums.
2D Testing Results
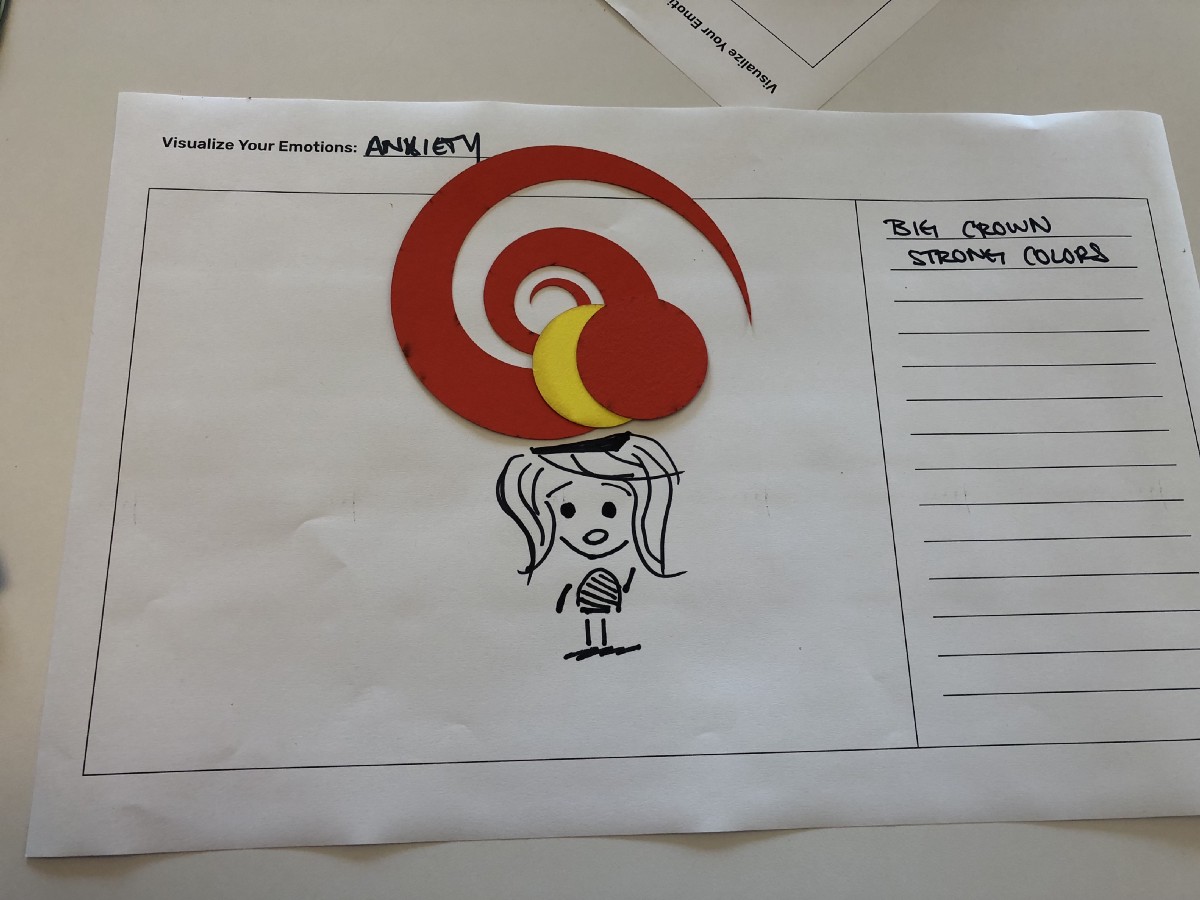
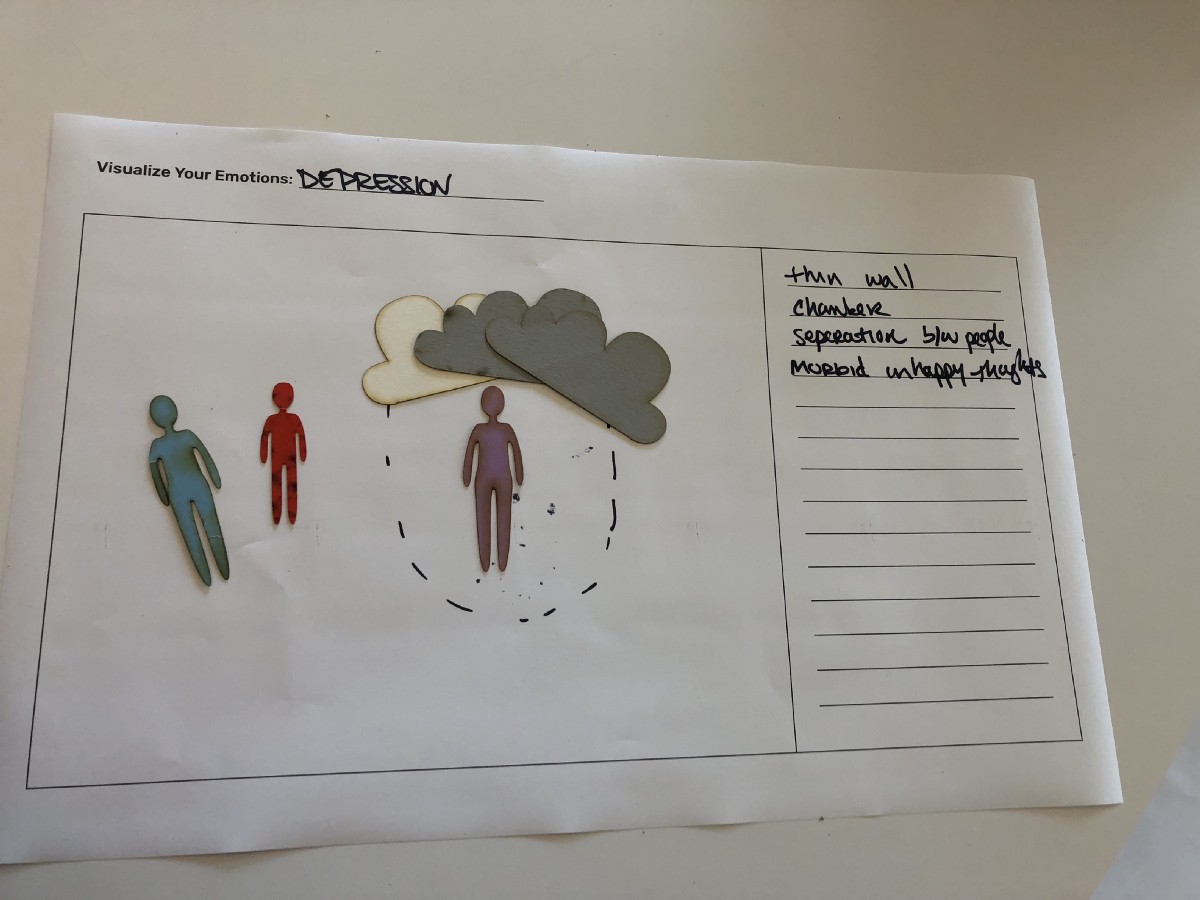
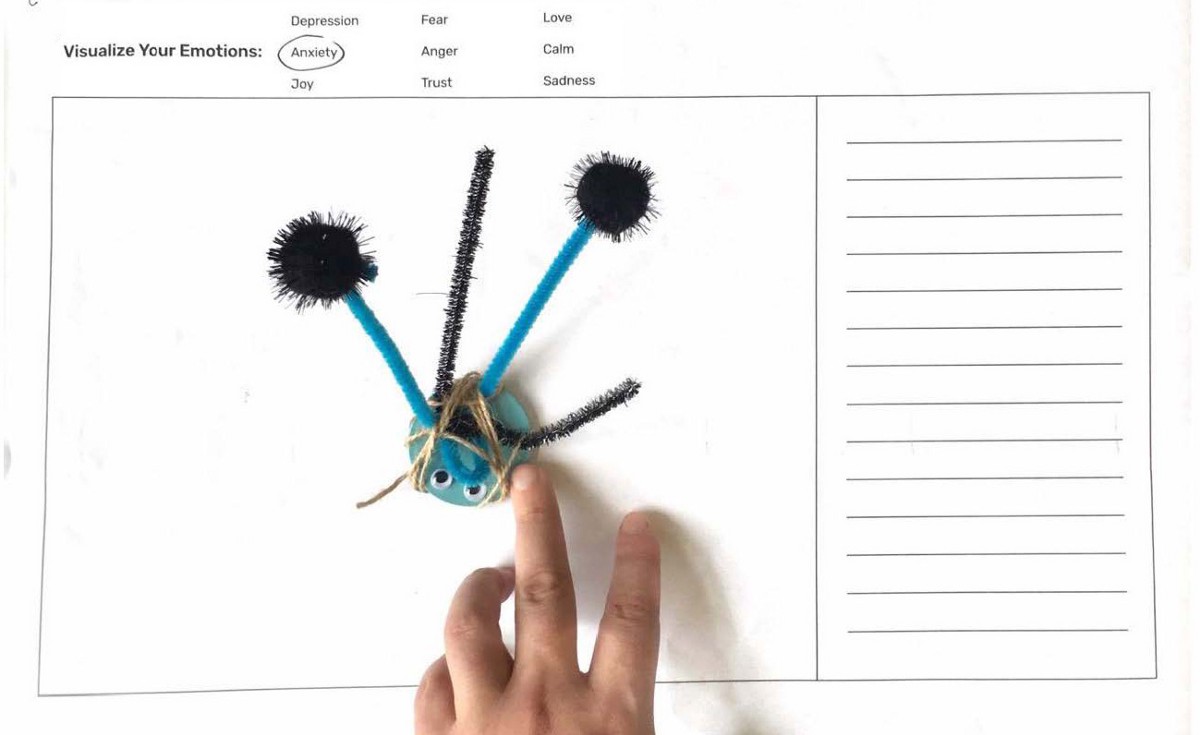
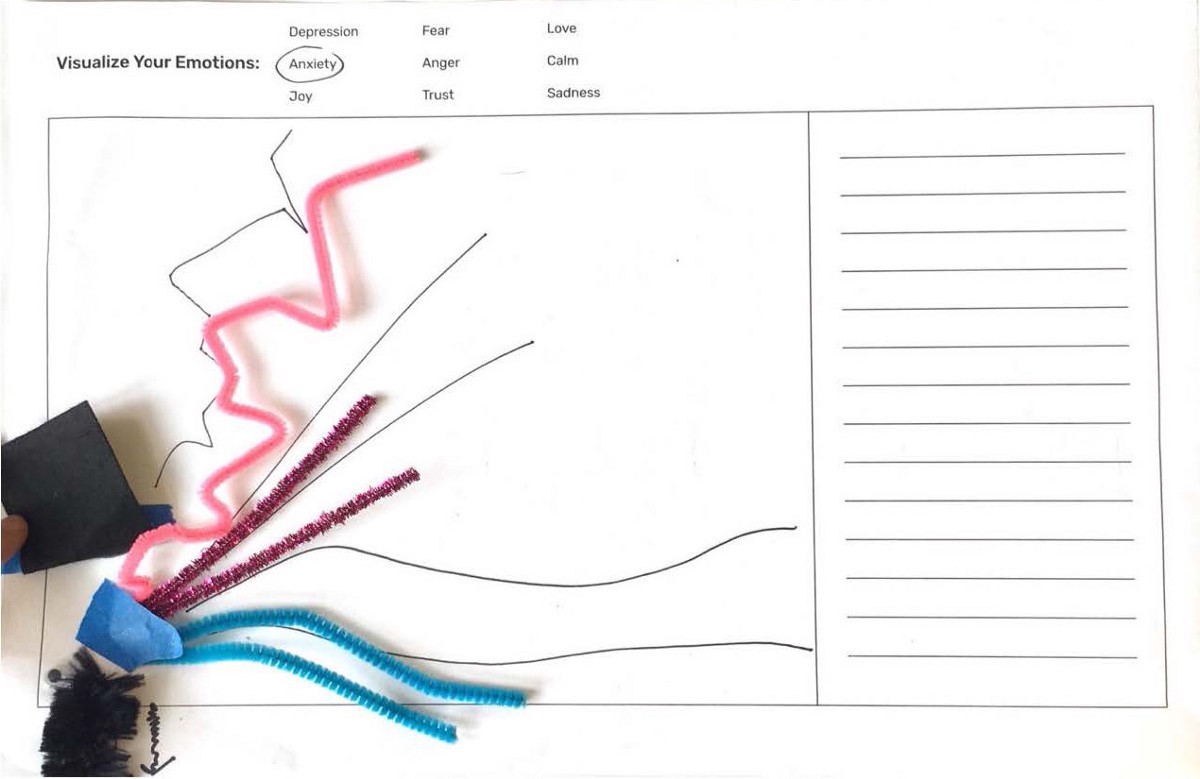
As a way of testing the potential of a 2-dimensional kit of parts in expressing emotion, we decided to borrow pieces from the Mental Landscapes set (thick stock paper cut into different shapes and colors.) Participants were asked to create a visualization of each of three emotions/mental states: Joy, Anxiety, and Depression. They were provided an 11″ x 17″ piece of paper with a space for them to work and room to annotate their creations. Testing with this initial kit revealed several things: Similarities in the shapes used for particular feelings, e.g. the spiral and anxiety, hesitation in engaging with creating something for depression (relative to joy and anxiety), and the benefit of reflecting on certain emotions, particularly anxiety.
3D Testing Results
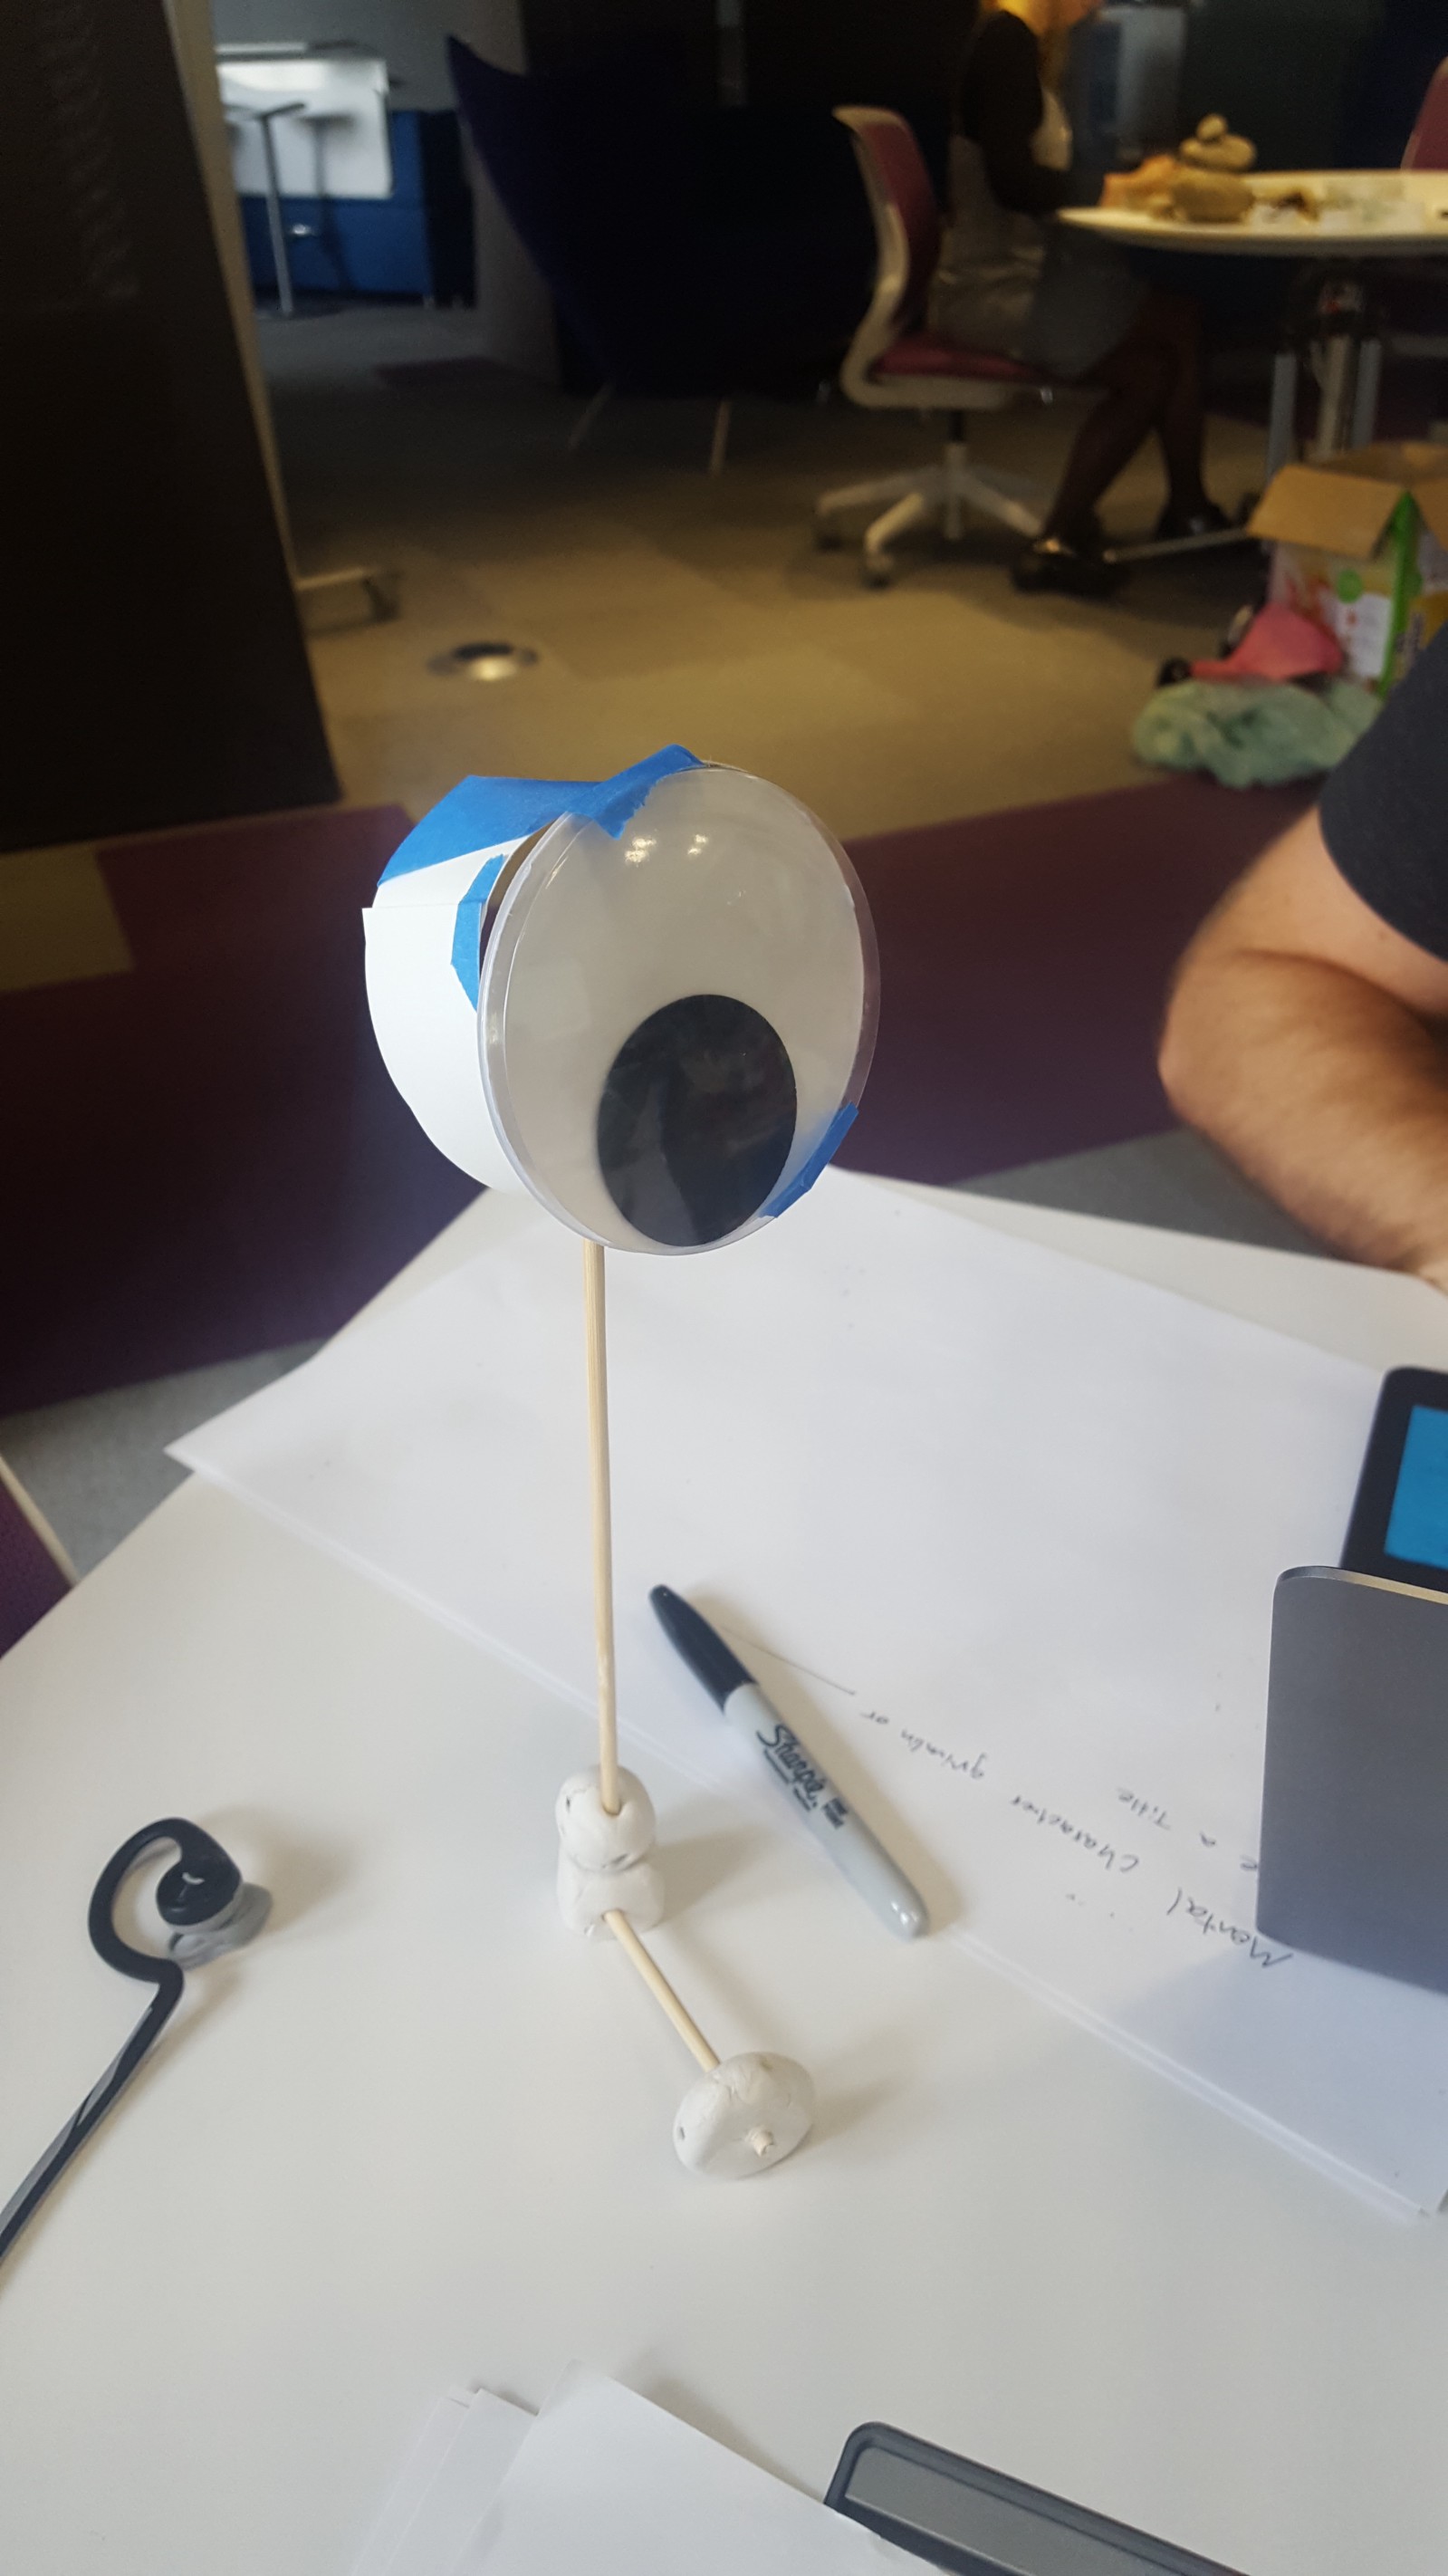
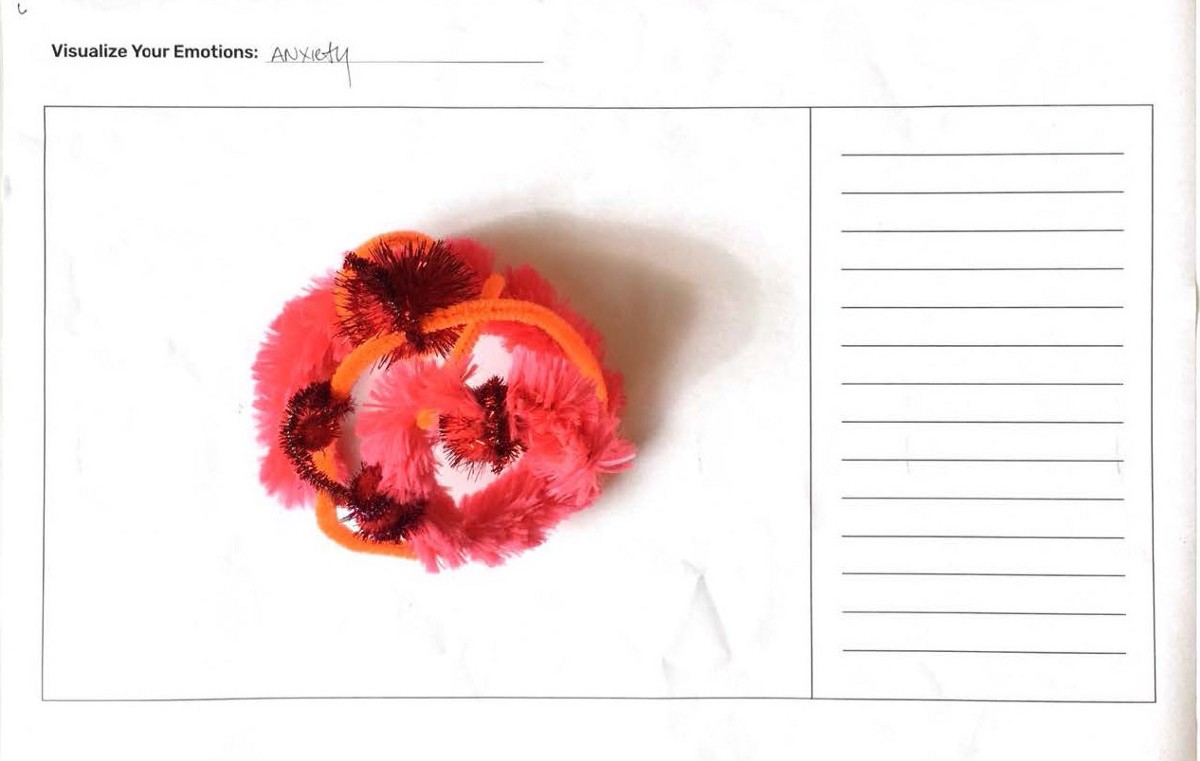
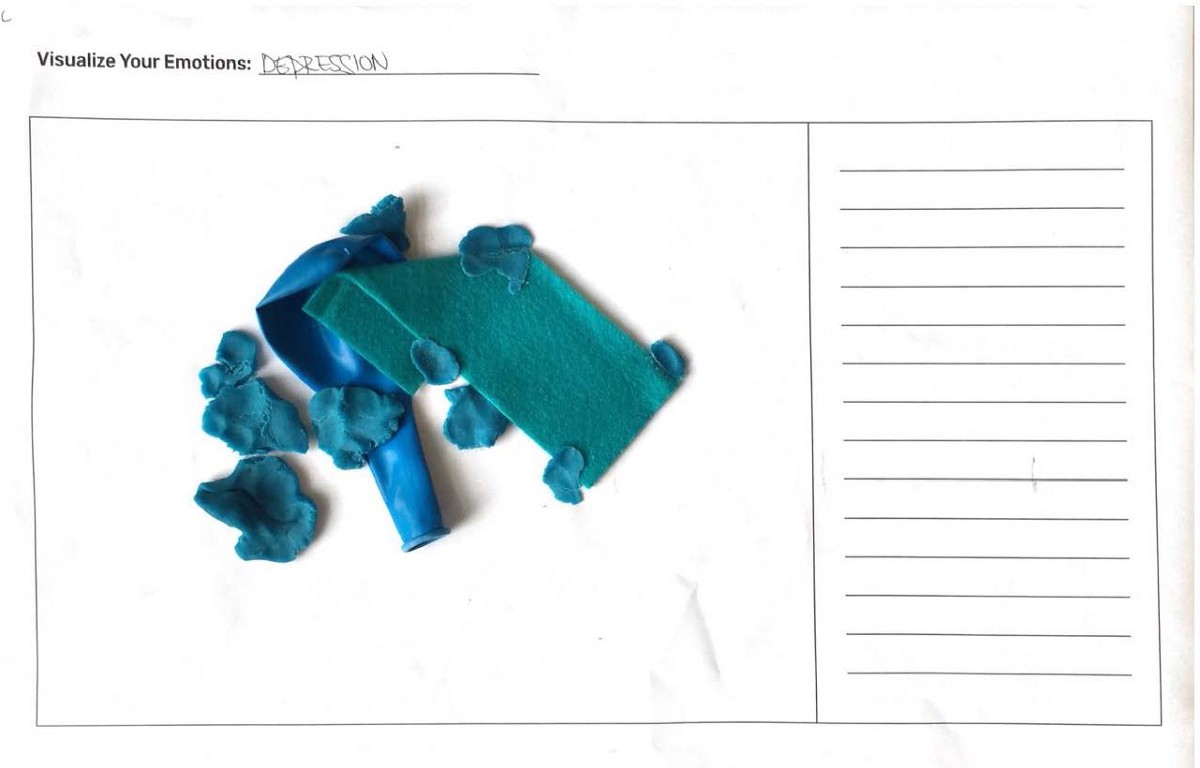
The second iteration of the kit provided materials to create a three dimensional object. The materials were found items that were available in the design studio. They included among other items, clay, pipe cleaners of various sizes and colors, fluffy balls, wooden skewers, fabric and balloons. Based on testing this kit with participants we found that the participants felt overwhelmed by the amount of material options presented to them and that it difficult to construct structures with large volumes. One interesting thing we observed is that the participants would give meaning to the texture of the elements they were choosing. For example, with the representation below (the pink one), the participant associated “energy” with the fluffy texture of the large pipe cleaner.
In class we decided to test our 3D kit with two classmates to solicit further feedback. Neither of our participants was interested in writing about their representation, and only one of the two felt comfortable sharing about their thought process after the fact. However, we observed some similar patterns in the ways participants chose to use the materials .
Reflection on Testing Results
In reflecting on the testing process, we found that we had conversations with participants about how they felt constrained or empowered by the materials provided. This underlying tension speaks to the unique ways in which people prefer to communicate, particularly when it comes to what can be sensitive topics, and the depth of what can be communicated. We experienced first hand the challenge of navigating the trade-offs we had seen in other projects about what you select to communicate, or in our case empower others to communicate. Two examples of projects we drew on that made choices between similar trade-offs were Giorgia Lupi and Kaki King’s “Bruises” and Jill Simpson’s “A Day of OCD — Conscious Acts of Checking”:
In the design of the visual for “Bruises,” Giorgia Lupi included quantified data, but focused on creating something that could evoke empathy and engage people at an emotional level.
Jill Simpson had to make a similar type of choice. She spoke with our class and commented on the challenge of deciding what to communicate and as a result, what to leave out. Although quantifying the acts of checking was critical to communicating how disruptive OCD is, she spoke about how this approach strips out the complexity and only represents one element of OCD.
Both projects acknowledge the challenge of communicating something so complex as mental health and emotion and make decisions on what to focus on in terms of what they communicate. Realizing the necessity of making a choice, we opted to create a fixed set of materials that would allow participants to feel safe to participate, without the pressure of judgment of their artistic or other skills, and potentially assign meaning to particular objects or qualities of objects. This decision came with an added benefit of enabling us to more easily identify similarities in how people choose to represent particular emotions. We also discovered that participants responded well to the opportunity to create in 3 dimensions. As a result, we began to design a new version of a kit for additional testing.
Week 1: September 13
Project kick off! For this project, we will be exploring how we can design methods that enable people to materialize, visualize or externalize their own experiences of mental health.
We began this project by examining others in this space including Brendan Dawes’ “States of Mind” and Candy Chang’s “A Monument for the Anxious and Hopeful.” While we were intrigued by the States of Mind project, one element we felt was missing was the ability to spark a meaningful conversation about the creations. This stemmed from the lack of identifiers for the images that were created. As a result, we wanted to be able to associate participant creations with an identifying word, e.g. an emotion. Chang’s project created a sense of community and encouraged conversation in a compelling way. This provided inspiration for our own publicly displayed collection that would have a similar result.
In addition to spurring conversation about the creations, we wanted to ensure that the creation process itself felt safe and helpful for participants. Creating a process that provides this, can be tricky. It was immediately clear from our group discussions and hearing from Viviana Ferrer-Medina in Carnegie Mellon University’s Counseling and Psychological Services, that allowing for anonymity, flexibility, and transparency in the process would be critical.
As a team, we performed a quick exercise to gain an understanding of the variety of ways different people may visualize emotions and mental health. Based on this quick exercise we decided to begin by exploring both 2D and 3D methods of visualization.